
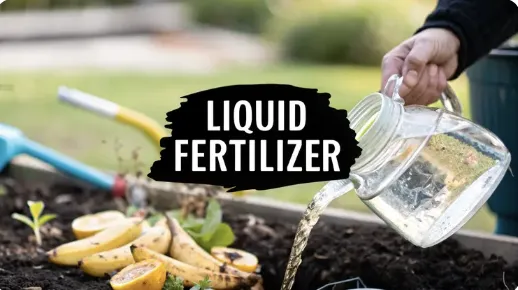
How to Make Liquid Fertilizer for Your Garden
How to Make Liquid Fertilizer for Your Garden
Making your own liquid fertilizer is one of those simple, satisfying garden tasks that pays you back tenfold. It's basically about steeping nutrient-rich stuff—like compost, kitchen scraps, or even pesky weeds—in water to create a potent "tea" for your plants.
This isn't a slow-release, set-it-and-forget-it kind of feed. This brew is a fast-acting, concentrated shot of nutrients that gives your garden an almost instant boost. It’s an easy, incredibly cost-effective way to get amazing results.
Why Homemade Liquid Fertilizer Is Your Garden's Best Friend

Once you learn how to make liquid fertilizer, you unlock a powerful tool for your garden. Granular fertilizers are great for long-term feeding, but they release nutrients slowly over time. Homemade liquid feeds, on the other hand, act fast.
Because all those good nutrients are already dissolved in water, your plants can slurp them up immediately through their roots.
This quick uptake makes DIY liquid fertilizer the perfect rescue remedy for struggling plants that need an urgent pick-me-up. It's also ideal for giving plants extra support during critical growth stages, like when they’re trying to set fruit or flowers.
The Benefits of Going Liquid
Making your own liquid fertilizer isn’t just about speed; it's about being smart, efficient, and sustainable. Commercial agriculture gets it—the global liquid fertilizer market is projected to hit $35.63 billion by 2032. That growth is all about a shift toward more efficient nutrient delivery, a principle you can put to work right in your own backyard. You can find more details about the liquid fertilizer market trends on coherentmarketinsights.com.
Here’s why so many gardeners are skipping the store-bought bottles and brewing their own:
It’s Practically Free: You can create top-tier fertilizer from materials you already have, like compost, grass clippings, or weeds you were going to pull anyway.
Gentle on Plants: When you dilute them properly, homemade fertilizers are far less likely to cause "fertilizer burn" than harsh synthetic options.
Improves Your Soil: Brews like compost tea don't just feed the plant; they add beneficial microbes to the soil, improving its structure and fertility for the long haul.
Super Versatile: You can use it as a soil drench to feed the roots or as a foliar spray, letting the leaves absorb nutrients directly.
Creating your own liquid fertilizer gives you complete control over what goes into your garden. You're recycling organic matter, feeding your plants exactly what they need, and building a more resilient, living soil ecosystem from the ground up.
Sourcing Ingredients From Your Own Backyard

Here’s the best part about making your own liquid fertilizer: you probably have everything you need right now. Forget another trip to the garden center. Your most powerful ingredients are likely waiting in the compost bin or hiding in plain sight as common garden "weeds."
This is all about turning what most people consider waste into black gold for your garden. It’s a simple, sustainable loop where nothing gets thrown out, and your plants get a supercharged meal straight from their own environment.
Kitchen and Garden Treasures
Before you think about buying a single thing, just take a walk around your yard. You’ll be shocked at the fertilizing power packed into materials you might normally toss. It’s just a matter of knowing what to look for and what each ingredient brings to the table.
Here are a few of my go-to free ingredients:
Finished Compost: This is the undisputed champion. It’s a balanced meal for your soil, teeming with microbes and a wide range of nutrients. Good compost is the foundation of any great liquid feed.
Grass Clippings: Fresh, green clippings are bursting with nitrogen. They're perfect for giving a quick boost to leafy greens like lettuce, kale, and spinach that need it for vigorous growth.
Nutrient-Rich Weeds: Some "weeds" are actually dynamic accumulators, meaning their deep roots pull up hard-to-reach minerals. Comfrey is legendary for its potassium content, which is exactly what fruiting plants like tomatoes and peppers crave. Stinging nettles are another powerhouse, loaded with nitrogen and trace minerals.
I swear by comfrey tea. I’ve seen firsthand how a couple of applications can make my pepper plants explode with flowers and fruit. It’s one of the most effective tools a gardener can have, and it costs nothing.
Kitchen Scraps: Don't throw out those used coffee grounds, eggshells, or banana peels. Coffee grounds add a nice hit of nitrogen, crushed eggshells offer a slow release of calcium, and banana peels provide valuable potassium.
The only gear you really need is ridiculously simple: a five-gallon bucket with a lid, some water (rainwater is ideal, but dechlorinated tap water works too), and an old piece of fabric or cheesecloth for straining. That’s it. You’re ready to start brewing.
Brewing Your First Batch of Compost Tea
If you're looking for the perfect entry point into homemade liquid fertilizers, start with compost tea. It’s simple, effective, and uses the best all-around garden amendment you can get: finished compost.
The goal here isn't just to pull nutrients out of the compost. It's to multiply the beneficial microbes that build healthy, living soil. Think of it as creating a probiotic tonic for your garden.
First things first, you need good compost. You're looking for the finished stuff—dark, crumbly, and with a rich, earthy smell. If it smells sour or unpleasant, it hasn't fully broken down, so don't use it. A good starting point is a ratio of about 1 part compost to 5 parts water in a standard five-gallon bucket.
This visual guide breaks down the simple steps for getting your compost tea started.

As you can see, the process is pretty straightforward. You're essentially just combining your compost and water, letting it steep, and then straining out the solids to get your finished liquid fertilizer.
The Brewing Process
To get started, you'll need dechlorinated water. The chlorine in most tap water can kill the very microbes you're trying to cultivate. If you’re on city water, it’s an easy fix: just let a bucket of tap water sit out for 24 hours. This gives the chlorine enough time to evaporate.
Once you combine the compost and water, give it a good, vigorous stir. The real magic happens over the next 24 to 48 hours. During this steeping period, you'll want to stir the mixture a few times a day. This agitation introduces oxygen, which is crucial for those beneficial aerobic microbes to thrive.
You’ll know your compost tea is ready when it has a deep brown color and still smells earthy and sweet. If it ever starts to smell foul, something's gone wrong, and it's best to start over.
The demand for effective, biologically active fertilizers is surging, reflecting a broader shift in agriculture. The global liquid fertilizer market, valued at around USD 8.98 billion in 2024, is forecast to grow to USD 14.84 billion by 2029. This growth highlights the recognized benefits of fast-acting, microbial-rich solutions like compost tea.
After brewing, strain the liquid through cheesecloth or even an old t-shirt to remove the solids. Your liquid gold is now ready to be diluted and applied to your garden.
For those looking to take their tea to the next level, we have a complete guide on how to make a batch of brewed compost tea that covers aeration and adding microbe food for an even more potent brew.
Now that you have compost tea down, it’s time to explore a few other simple—but powerful—homemade fertilizer recipes. These brews use materials you probably already have lying around to give your plants exactly what they need, right when they need it.
Think of these as specialized tonics for your garden. Compost tea is a fantastic all-arounder, but a nitrogen-heavy "weed tea" is like a power smoothie for leafy greens. A mineral-focused mix, on the other hand, is perfect for hungry fruiting plants.
Brewing a Nitrogen-Rich Weed Tea
Some of the most nutrient-dense plants in your yard might be the very ones you're trying to pull. Weeds like comfrey and stinging nettles are what we call "dynamic accumulators"—their deep roots pull valuable minerals from way down in the subsoil. You can actually harness that power by making a fermented plant tea.
It’s pretty simple. Just fill a five-gallon bucket about two-thirds full with chopped comfrey leaves, nettles, or even fresh grass clippings. Top it off with water, put a lid on it (loosely, so gases can escape), and let it sit for two to four weeks.
A quick heads-up: this mixture will develop a very strong smell as it ferments. This is totally normal and a good sign that the nutrients are breaking down. Just be sure to keep your brewing bucket somewhere far from the house.
Once it's ready, you'll have a dark liquid that's a real nitrogen powerhouse. Strain it and dilute it at a 1:10 ratio with water. Use this on leafy greens like lettuce, spinach, and kale to kickstart vigorous, lush growth.
A Mineral Mix for Fruits and Flowers
Your kitchen scraps can also become garden gold. Banana peels and eggshells, in particular, offer key minerals that support heavy-feeding flowering and fruiting plants like tomatoes, peppers, and squash.
Banana Peels: A fantastic source of potassium, which is absolutely vital for flower development and fruit production.
Eggshells: These provide a slow-release source of calcium, helping to prevent common issues like blossom end rot in tomatoes.
To make this simple fertilizer, just soak a few banana peels and cleaned, crushed eggshells in a jar of water for several days. Strain the liquid and use it to water your fruiting vegetables. It's an incredibly easy way to turn kitchen waste into something your garden will love. To explore other options, check out our complete guide on finding the best natural fertilizer for vegetables.
This hands-on approach is really just a small-scale version of what's happening in the wider world of agriculture. Even large-scale farming is adopting smarter nutrient management, with the Asia-Pacific region alone holding 46% of the USD 1.3 billion liquid fertilizer market in 2024. If you're curious about these global innovations, you can learn more about them over at precedenceresearch.com.
Dilution and Application Cheat Sheet
Getting the dilution ratio right is probably the most important step. Too strong, and you can burn your plants' roots. Too weak, and you won't see much of a benefit. This little cheat sheet is a handy reference to keep you on track.
, weed tea (1:10, every 2 weeks, leafy greens), banana peel/eggshell tea (1:5, every 2–3 weeks, fruiting crops), and fish emulsion (1:16, every 3–4 weeks, nitrogen boost).")
Remember, these are just guidelines. Always watch your plants for their reaction. If you see yellowing leaves or slow growth, they might need a feeding. If they look lush and green, you can probably hold off for another week. Your garden will tell you what it needs if you pay attention.
Using and Storing Your Liquid Gold
Making your own fertilizer is half the battle—knowing how to use it is what really makes a garden thrive. The most important thing to remember with any homemade liquid fertilizer is to dilute it. These teas are super concentrated, and if you pour them straight onto your plants, you can easily damage or "burn" the roots.
A good rule of thumb for most compost or weed teas is a 1-to-10 ratio, meaning one part fertilizer concentrate to ten parts water. If you're mixing up a foliar spray to mist the leaves, go even weaker. A 1:20 mix is much safer for direct foliage contact.
You have two great ways to apply this stuff. The first is a soil drench, which just means pouring the diluted mix directly around the base of your plants. This is the best way to feed the root system and all the beneficial microbes living in the soil.
Your other option is a foliar spray. Just pour your diluted brew into a spray bottle and mist the leaves. Plants are surprisingly good at absorbing nutrients right through their foliage, so this method works wonders for a quick pick-me-up, especially if a plant is showing signs of a deficiency.
Timing and Storage Tips
When you apply your fertilizer matters. The best time is always in the cool of the early morning or evening. If you feed your plants in the heat of the midday sun, the liquid can evaporate before it soaks in, and you might even scorch the leaves.
To keep your homemade liquid gold potent, store the undiluted concentrate in a sealed container in a cool, dark place like a garage or shed. Proper storage prevents sunlight and heat from breaking down the valuable nutrients and microbes.
Applying your homemade fertilizer the right way ensures your plants get every bit of goodness you brewed up for them. To round out your feeding strategy, check out our guide on the best organic vegetable fertilizer options to use alongside your homemade teas.
Got Questions About Making Liquid Fertilizer?
Once you start brewing your own liquid fertilizer, a few questions always seem to pop up. Getting the right answers can be the difference between a lush, thriving garden and a frustrating science experiment gone wrong. Let's dig into some of the most common things gardeners wonder about when they first start making their own plant food.
One of the first things people ask is how often to use it. A good rule of thumb is to feed your garden plants with a diluted liquid fertilizer every two to four weeks during the main growing season. Plants in containers are a different story, though. They have a limited amount of soil and nutrients wash out faster, so they often need a drink every 7-14 days.
What Scraps to Use (and What to Avoid)
When you're making a fertilizer tea from kitchen scraps, what you put in is everything. You want to stick with plant-based materials that break down cleanly and are packed with the good stuff.
Good Scraps to Use:
Vegetable peelings and ends
Fruit scraps (banana peels are fantastic)
Used coffee grounds and tea leaves
Crushed eggshells for a calcium boost
On the other hand, some things should never go into your brew. They can attract pests, create some truly awful smells, and even introduce harmful pathogens into your garden soil.
Scraps to Avoid:
Meat, fish, or any kind of bones
Dairy products like milk or cheese
Anything oily or greasy
Cooked foods loaded with salt or sauces
A lot of people worry about the smell. A healthy fertilizer tea should smell earthy, like a forest floor after it rains. If your brew smells sour, rancid, or just plain foul, that’s a red flag. It means anaerobic (oxygen-starved) bacteria have taken over. The best fix is to dump the batch, give your bucket a good scrub, and start over. Make sure you stir it more often next time to get more oxygen in there—that simple step usually prevents the problem and is a key part of learning how to make this stuff right.
At The Grounded Homestead, we believe growing your own food should be simple and rewarding. For more tips, guides, and inspiration to help you on your gardening journey, visit us at TheGroundedHomestead.com.


Facebook
Instagram
X
Youtube