Greenhouse Gardening for Beginners Guide
Greenhouse Gardening for Beginners Guide
Welcome to the world of greenhouse gardening, a place where you can call the shots on the seasons and grow plants you never thought possible. A greenhouse gives you the power to stretch your growing season, protect your crops from wild weather, and pull in consistently impressive harvests.
It’s a rewarding journey, and it’s more doable than you might think.
Your Journey into Greenhouse Gardening Begins Here
Stepping into greenhouse gardening feels like unlocking a new level of control over your food and your garden. It’s a big move from traditional gardening, where you’re often at the mercy of surprise frosts, scorching heat waves, or that one rabbit who keeps finding a way through the fence.
With a greenhouse, you’re creating your own managed ecosystem. It’s a private sanctuary where your plants can truly thrive.
This controlled environment is a total game-changer. Imagine picking ripe, juicy tomatoes in early spring or late fall, long after your neighbors’ outdoor plants have given up. Or picture yourself growing delicate herbs and crisp lettuces all year round, safe from hungry deer and destructive bugs. This is the power a simple structure gives you.
Overcoming Common Beginner Hurdles
I get it. A lot of aspiring gardeners get hung up on two things: cost and space. It’s easy to picture a greenhouse as some expensive, sprawling luxury that takes over the whole backyard. But that’s not the full story.
The options today range from small, affordable cold frames and portable pop-up greenhouses to more substantial hobby kits. You don't need a huge plot of land; a small patio or a sunny corner can be just right for a lean-to model.
The real key is starting with a clear plan. When you know what you want to grow and what you have to work with, your investment—big or small—will pay off in delicious, homegrown food. If you're just getting started on that front, our guide to garden planning for beginners is the perfect place to build a solid foundation.
Key Takeaway: A greenhouse is more than just a building; it's an investment in your food security, a longer growing season, and a deeper connection to what you eat.
A Growing Movement
You're not alone in this. Greenhouse gardening is a huge part of the bigger shift toward sustainable agriculture and local food. The global greenhouse market is currently valued at around $15 billion and is expected to climb to about $25 billion by 2033.
This isn’t just about big commercial farms; it’s driven by everyday people wanting more control over their food source. You can find more details on this expanding market over at marketreportanalytics.com. This growth just proves how much value we’re all starting to place on knowing where our food comes from.
How to Choose the Right Greenhouse
Picking out your first greenhouse is a pretty big deal. It’s the first real step you take, and it sets the tone for your whole gardening journey. The goal isn't to find the biggest or fanciest model out there. It's about finding the right fit for your yard, your wallet, and what you actually want to grow.
Think of it like buying your first car. A slick sports car looks amazing, but it’s useless if you need to haul around kids and groceries. In the same way, a giant, elegant glass greenhouse might be the dream, but it's complete overkill for a small city patio where a compact lean-to model would do the job beautifully. Your specific situation is what really matters. Let's break down the key parts to focus on.
Understanding the Bones: Frame and Glazing Materials
A greenhouse is really just two main parts: the frame (its skeleton) and the glazing (its skin). Both are equally critical for keeping your structure standing and your plants happy.
When you're choosing your greenhouse, the materials you pick for the frame and glazing will have the biggest impact on its durability, insulation, and overall cost. Here’s a quick rundown to help you decide.
Greenhouse Material Comparison for Beginners

For most people just starting out, the combination of an aluminum frame and twin-wall polycarbonate panels hits the sweet spot. It offers a fantastic balance of durability, safety, and performance without the hefty price tag and fragility that comes with glass.
Sizing Up Your Space and Budget
Your available space and how much you're willing to spend are the two biggest real-world limits you'll face. I've seen it time and time again: a beginner underestimates how much room they'll actually need. You'll be absolutely shocked at how fast you can fill up a greenhouse once you get going!
If you have the yard space for an 8'x10' model but your budget only stretches to an 8'x6', my advice is to wait and save up for the bigger one. You’ll thank yourself later.
Let's take a look at how material costs really shake out. This visual breaks down the average cost per square foot for the most common glazing materials.
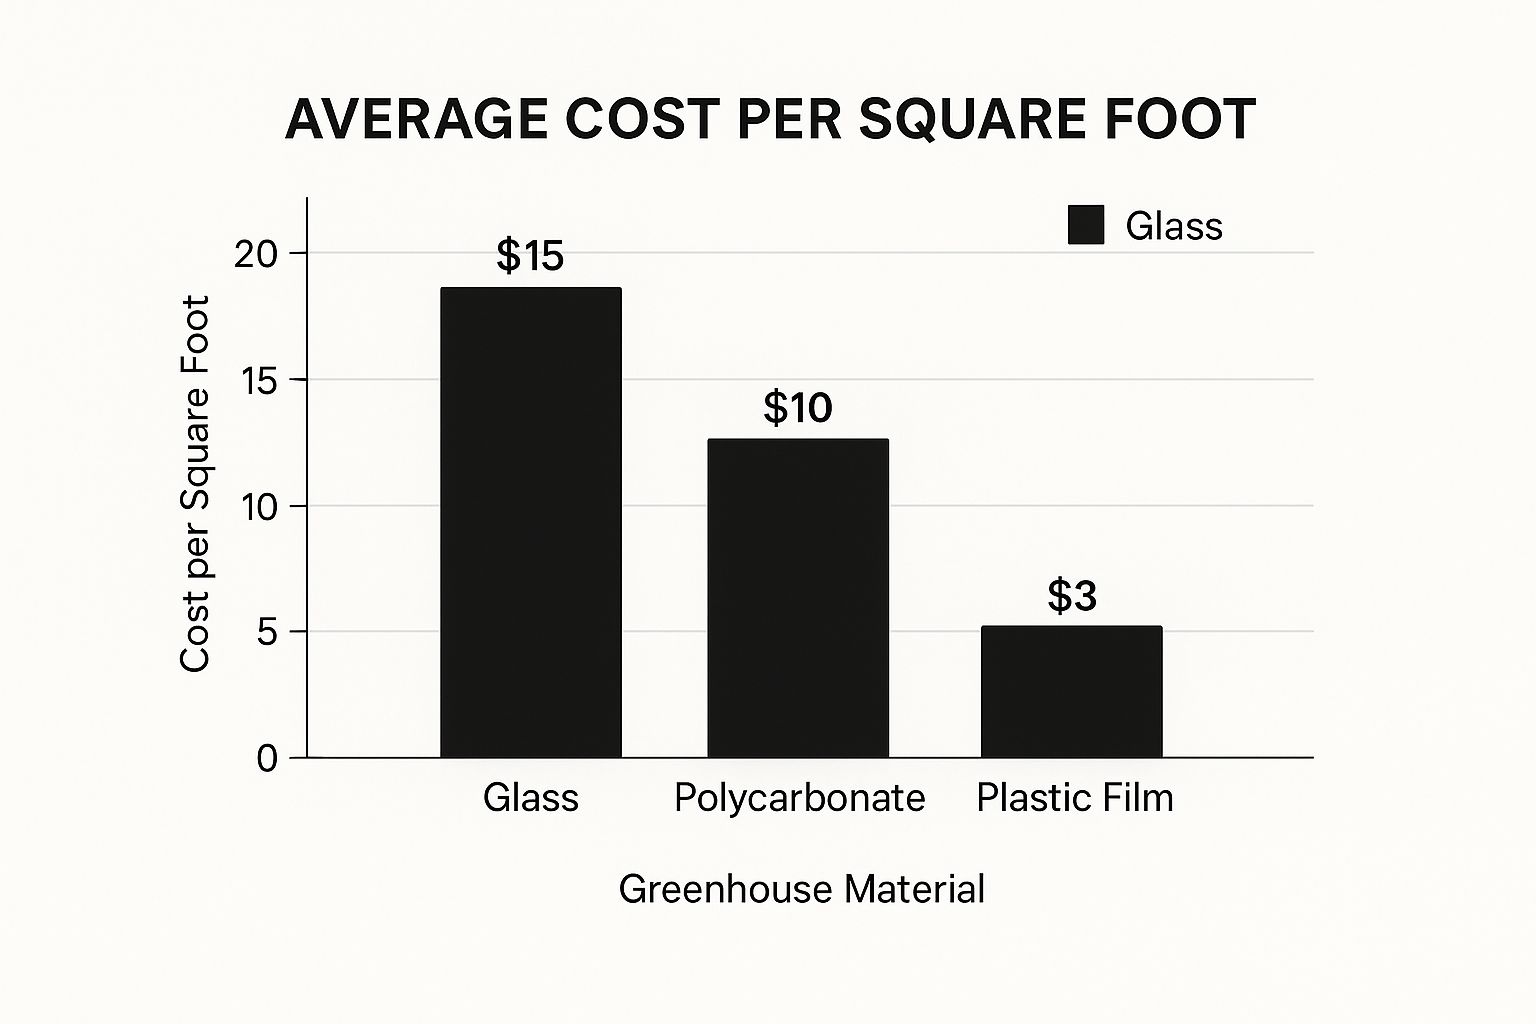
As you can see, glass sits at the premium end. On the other hand, a simple plastic film covering is much friendlier on the wallet, but you have to accept that you'll be replacing it far more often.
Matching the Greenhouse to Your Garden Goals
Finally, take a moment to think about what you actually want to grow. Your ambitions will dictate the kind of structure you need.
Are you just looking to get a head start on your spring seedlings? Or are you dreaming of overwintering tender perennials and growing fresh food all year long?
A simple, unheated hoop house or a cold frame might be all you need for basic season extension. But if you have visions of harvesting tomatoes in January while living in a colder climate, you'll need something much more robust. That means a sturdier structure with better insulation (like thicker polycarbonate) and the space to eventually add heating and ventilation systems.
For instance, a freestanding 8'x12' model in a suburban backyard gives you plenty of room to experiment with a wide variety of crops. But for an urban gardener focusing on herbs and greens, a 4'x8' lean-to model tucked against a sunny, south-facing wall is a perfect, space-saving solution.
Your Greenhouse Site and Foundation Setup
So you've picked out the perfect greenhouse kit. Now for the exciting part—bringing it to life right in your own backyard. But hold on. Where you put it and what you put it on are just as critical as the structure itself. Get this wrong, and you'll spend your time fighting the elements instead of growing plants.
The perfect site is so much more than just a flat patch of grass. It’s a strategic choice that will influence everything from your plants' health to how much you enjoy the whole process. Take some time to walk your property and watch how the light moves.
Finding the Perfect Spot
Your main goal is to find a location that gets at least six hours of direct sunlight every day. This is especially important during the short, dim days of winter. I've found an east-facing spot is often ideal, as it catches all that great morning sun but gets a bit of a break from the harsh afternoon heat.
Next up, think about convenience. How far are you willing to lug heavy bags of soil, tools, and watering cans? Placing your greenhouse near an outdoor water spigot and an electrical outlet will make your life worlds easier down the road. Trust me, nothing dampens the gardening spirit faster than hauling sloshing water buckets across the yard on a hot day.
Finally, consider protection. You want sun, but you don't want your greenhouse getting hammered by high winds, which can stress the panels and cause wild temperature swings.
Windbreaks: A nearby fence, a sturdy hedge, or even the side of your house can offer fantastic protection from those prevailing winds.
Tree Proximity: Whatever you do, don't build it directly under large trees. Falling branches are a huge hazard, and the shade will severely limit your growing options.
Drainage: Make sure water flows away from the site. You don’t want your foundation sitting in a puddle after every heavy rain.
Building a Solid Foundation
Every greenhouse, no matter how small, needs a stable and level base. I’ve seen so many beginners skip this step, only to end up with warped frames, doors that won't shut, and a structure that feels wobbly in a storm. The foundation you choose will depend on the size of your greenhouse and your local ground conditions.
For many kits, a simple treated wood perimeter is a great, effective choice. Building a frame with 4x4 or 4x6 timbers, making sure it’s perfectly level, and securing it with rebar stakes gives you a solid anchor for the greenhouse. For smaller, lighter kits, you can also get away with a base of leveled pavers or concrete blocks.
If you’re investing in a larger or more permanent glass structure, you’ll want to consider a poured concrete slab or at least concrete footings. It’s more work upfront, but it provides unmatched stability and longevity.
My Personal Tip: Before you touch a single screw, do a full inventory. Lay out every single piece and check it off against the parts list in the manual. Yes, it’s tedious, but finding out you’re missing a critical bracket halfway through the build is a whole new level of frustration. I like to organize parts into labeled groups (like "wall supports," "roof vents," etc.). It saves hours of digging through boxes later.
Creating the Perfect Growing Environment
Alright, your greenhouse structure is officially up. Now for the fun part—turning that empty shell into a living, breathing ecosystem. This is where you get to play Mother Nature, creating and managing the internal climate to give your plants exactly what they need to thrive, no matter what the weather is doing outside.
The two biggest factors you'll constantly be juggling are temperature and humidity. It's a bit of a balancing act. If it gets too hot, your plants will wilt from heat stress. Too cold, and their growth grinds to a halt. In the same way, high humidity is an open invitation for fungal diseases like mold and mildew, a common headache for new greenhouse owners.
Your first line of defense is always going to be ventilation. Most greenhouse kits come with at least one roof vent. Use it. Even on a cool but sunny day, the inside of your greenhouse can heat up astonishingly fast. A good rule of thumb is to open the vents whenever the temperature inside climbs about 10°F (5.5°C) higher than the air outside.
Managing Airflow and Temperature
While manually opening and closing vents works, automating your climate control will make your life a whole lot easier. An automatic vent opener is a fantastic first upgrade. These nifty gadgets use a wax-filled cylinder that expands with heat, pushing the vent open for you. It’s a true set-and-forget solution that protects your plants even when you’re not around.
To keep air moving consistently, I highly recommend adding a small oscillating fan. Circulating air prevents those stagnant, humid pockets where diseases love to take hold. As a bonus, it also helps strengthen your plant stems, preparing them for a sturdier life.
Key Takeaway: Good airflow is non-negotiable. It helps regulate temperature, slash humidity, and stop common fungal diseases in their tracks. A simple fan can make a world of difference for the health of your garden.
When the summer heat really kicks in, you’ll need to cool things down. The easiest and most effective way to do this is with a shade cloth. They’re available in different densities, but a 40-50% shade cloth is generally perfect for most vegetables. It blocks just enough of that intense sunlight to prevent scorching without stunting growth.
Smartly Organizing Your Interior Space
With your climate under control, it's time to think about your layout. Don't just stick pots on the floor—that’s a quick recipe for a cluttered and inefficient garden. The real key to a productive greenhouse is using vertical space with benches and shelving.
I like to use tiered shelving along one wall for starting seedlings and growing smaller potted plants like herbs. Sturdy workbenches are perfect for those heavier containers holding your tomatoes or peppers. This kind of organization doesn't just give you more room; it also improves airflow around each plant, which again, helps cut down on disease risk.
Benches: Set them at a comfortable working height to save your back. If you can find or build ones with slatted tops, they’re fantastic for promoting drainage.
Shelving: Opt for adjustable shelves. This way, you can move them around to accommodate your plants as they grow taller throughout the season.
A smart layout also makes daily chores, like watering, much more efficient. Try grouping plants with similar water needs together. If you want to dive deeper into this crucial topic, you can learn more about how often you should water plants in our detailed guide, which covers everything from plant type and pot size to environmental factors.
By thoughtfully managing your greenhouse environment and organizing the space from the get-go, you’ll create a productive garden that's a genuine joy to work in and will reward you with some incredible harvests.
Choosing Your First Greenhouse Plants
This is the fun part. With your greenhouse finally set up, the temptation is to try and grow everything at once. But trust me on this: the key to building confidence is to score some early, easy wins.
Your goal for the first season isn't a complex, multi-crop jungle. It's about getting a feel for the space and seeing some real results. Start with forgiving, high-yield plants that are known to love greenhouse life. That initial success is what will fuel your passion for years to come.
Easy Plants for Early Success
For your first go-around, you want crops that are practically begging to be grown in a greenhouse. These selections are resilient, grow quickly, and give you a tangible, tasty reward for your efforts.
You can't go wrong starting with these:
Leafy Greens: Varieties like 'Black Seed Simpson' lettuce, spinach, and Swiss chard are incredibly fast growers in the stable climate of a greenhouse. You can often start harvesting outer leaves in just a few weeks.
Radishes: These are the definition of instant gratification in the garden. Many varieties rocket from seed to harvest in under 30 days. They’re perfect for tucking into small, empty spaces while you wait on bigger plants.
Herbs: Basil, mint, parsley, and chives are fantastic choices. They grow compactly in pots and give you fresh flavors for your kitchen all year long. Basil, in particular, absolutely adores the extra warmth.
My Personal Tip: When you're just starting out, dedicate a small, focused section of your greenhouse to a single, easy crop. Honestly, watching a full tray of lettuce thrive is far more motivating than juggling the complex needs of five different, finicky plants at once.
Warm-Season vs. Cool-Season Crops
Your greenhouse is a time machine, letting you grow plants far beyond their normal outdoor schedule. To really make the most of it, you need to understand the fundamental difference between warm-season and cool-season crops.
Warm-season crops are the heat-lovers that thrive in the peak of summer. Your greenhouse gives them the consistent, cozy warmth they crave, helping them produce like mad.
Think of plants like:
Tomatoes: Bush or "determinate" types like 'Celebrity' or 'Patio' are perfect for growing in containers inside a greenhouse, keeping them manageable.
Peppers: Both sweet bell peppers and spicy jalapeños flourish with that extra, trapped heat.
Cucumbers: Vining varieties are a smart choice. You can train them up a trellis to save precious floor space and get an incredible harvest.
It’s no surprise that tomatoes are a greenhouse superstar, dominating global cultivation by occupying about 36% of greenhouse areas worldwide. They're a proven winner for a reason. And the market is always evolving; we're seeing more growers use glass greenhouses for strawberries, which just shows how versatile these structures are.
Cool-season crops, on the other hand, prefer milder temperatures. They tend to bolt (go to seed) if things get too hot. Your greenhouse lets you get a head start on them in early spring and extend their life deep into the fall. Kale, broccoli, and carrots fall squarely in this camp.
As your skills grow, you might even find yourself wanting to learn how to grow strawberries from seed, another crop that benefits immensely from a controlled environment. By picking the right plants for the right time of year, you'll keep your greenhouse productive and your kitchen stocked.
Common Greenhouse Gardening Questions
Even with a perfect plan, you're going to have questions. It's just part of the process, and knowing where to find good answers can turn a frustrating hurdle into a confident step forward. Over the years, I've heard a few questions pop up time and time again from new greenhouse gardeners.
Let's get some of those common sticking points cleared up right now.
Do I Really Need Power and Water in My Greenhouse?
Technically, no. But will having them make your life a whole lot easier and your garden far more productive? Absolutely. Think of it like camping—you can survive in a basic tent, but a cabin with plumbing and electricity is a lot more comfortable and functional.
Electricity is what lets you automate the essentials. You can run fans for ventilation, plug in a small heater to ward off a surprise frost, or add supplemental grow lights to get you through the dim days of winter.
And a nearby water tap? It saves you from the back-breaking work of hauling watering cans back and forth, day after day. My advice is to always, if possible, position your greenhouse where you can safely run an outdoor extension cord and a garden hose. It makes managing your little ecosystem so much simpler.
How Do I Handle Pests in an Enclosed Space?
Pest control in a greenhouse is all about prevention. It’s a closed environment, which means a small problem can turn into a full-blown infestation before you know it. The best defense starts before you even put a single seed in soil.
Always start with sterile potting mix and thoroughly inspect any new plants for hit h-hikers before bringing them into your greenhouse. It’s also a great idea to install fine mesh screens over vents and doors. This simple barrier is surprisingly effective at keeping unwanted guests out.
If pests do manage to sneak in, don't immediately reach for the harsh chemicals.
Start with physical removal. You can hand-pick larger bugs or use a sharp spray of water from a hose to knock aphids right off the leaves.
Use gentle treatments. Insecticidal soap and neem oil are fantastic, less-toxic options for common troublemakers like spider mites and whiteflies.
Bring in the good guys. Releasing beneficial insects like ladybugs or lacewings can be incredibly effective. Think of them as your garden's personal security team.
Key Takeaway: The secret to greenhouse pest management is a proactive, preventative approach. By being vigilant and using gentle solutions, you can keep a healthy, balanced ecosystem without resorting to harsh pesticides that linger in an enclosed space.
Can I Actually Garden All Year Round?
Yes, that’s one of the biggest payoffs of having a greenhouse! But your success hinges on your local climate and your setup. It's not always as simple as just closing the door and expecting a constant harvest.
In milder climates, an unheated greenhouse can easily keep you in cool-weather crops like kale, spinach, and carrots right through the winter. It’s a fantastic way to extend your growing season by months.
But if you live somewhere with freezing winters, you'll need a reliable, thermostatically controlled heater to keep warm-weather crops like tomatoes or peppers alive and producing. You’ll also probably need to add supplemental lighting. To stay healthy and productive, most plants need 12-16 hours of light, and the short, gray days of winter just won't cut it.
Ready to dig deeper and cultivate your own thriving oasis? At The Grounded Homestead, we're dedicated to helping you gain the skills and confidence to grow your own food. Explore our resources and join a community of gardeners and homesteaders on the same journey. Learn more at https://thegroundedhomestead.com.


Facebook
Instagram
X
Youtube