
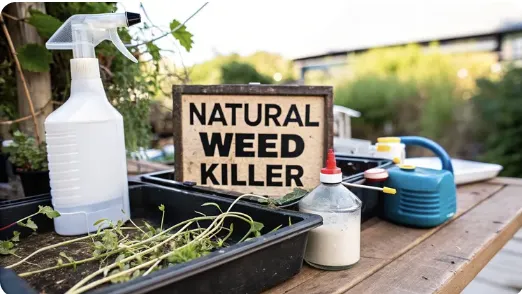
A Powerful Natural Weed Killer Recipe That Works
A Powerful Natural Weed Killer Recipe That Works
If you’ve ever found yourself staring down a crack in the driveway full of stubborn weeds, you know the temptation to reach for a powerful chemical spray. But you also know the hesitation that comes with it. What will it do to the soil? Is it safe for the dog?
There’s a simpler, more grounded way. The most effective natural weed killer I’ve ever used is a mix of horticultural vinegar, salt, and a squirt of dish soap. It’s a powerful trio that works fast, drying out unwanted growth without leaving behind harsh, lingering chemicals.
Why a Natural Weed Killer Is Your Garden's Best Ally

Let’s be honest, the frustration with conventional weed killers is real. The worries about what they might do to pets, kids, and the bees buzzing around your flowers often outweigh the convenience. Many of us are moving away from those synthetic herbicides, looking for homemade solutions that give us back control over our garden's health.
This isn't just about avoiding chemicals. It's about a fundamental shift in how we approach gardening—working with nature, not against it. It's about building healthy soil for the long haul, something commercial sprays can't promise. A good homemade weed killer recipe lets you tackle weeds effectively without compromising your principles.
The Growing Demand for Safer Solutions
This isn't just a backyard trend; it's a global movement. The market for bioherbicides—weed killers made from natural sources—was valued at USD 3.37 billion in 2024 and is expected to climb. That number tells a story: people everywhere are demanding safer, more ecologically sound ways to manage their land. You can find more data on the bioherbicides market over at Grand View Research.
When you choose to mix your own weed killer, you immediately gain a few key advantages:
You're in control. You know exactly what’s in your sprayer. No mysterious chemicals.
It’s budget-friendly. The ingredients are cheap, everyday household staples you probably already have.
You protect your patch. You’re not introducing persistent synthetic compounds into your little corner of the world.
Ultimately, using a natural weed killer recipe is about empowerment. It gives you the tool to solve a common garden problem while staying true to your commitment to a healthier, more organic space. You’re aligning your actions with nature, and that’s a powerful feeling.
Getting to Know the Core Ingredients

The real magic behind this weed killer isn't some complicated chemical formula. It's a simple, potent combination of three things you probably already have in your house.
Each ingredient has a specific job, and understanding how they work together is the key to knocking down those stubborn weeds in your driveway cracks or along a fence line. It’s a triple-threat approach that attacks a weed's ability to survive.
The Power of High-Strength Vinegar
The heavy lifter here is vinegar—or more specifically, its acetic acid. While the white vinegar in your pantry has about 5% acetic acid, what you really want is horticultural vinegar. This stuff is a game-changer, packing a concentration of 20% to 45%.
That higher concentration is what does the real work. Acetic acid is a desiccant, which is a fancy way of saying it pulls moisture right out of a plant's leaves. When you spray a weed, the acid quickly breaks down the cell membranes, causing the foliage to dry out, wilt, and turn brown. On a sunny day, you can often see the results in just a few hours.
Why Salt Is a Crucial Addition
Next up is salt. You can use regular table salt (sodium chloride) or Epsom salt (magnesium sulfate). It works by messing with the plant's internal water balance, creating a double whammy alongside the vinegar.
While the vinegar is scorching the leaves from the outside, any salt that gets absorbed makes it tough for the roots to pull up water from the soil. This internal dehydration helps finish the job and kill the plant more thoroughly.
A crucial takeaway here is that salt can build up and harm your soil over time. That’s why this recipe is best for areas where you don’t want anything to grow—think gravel driveways, patios, and sidewalk cracks.
The Role of Dish Soap as a Surfactant
Finally, a little bit of dish soap is the secret ingredient that makes the whole solution stick. Many weeds have a waxy or hairy coating on their leaves that causes water to just bead up and roll right off.
The dish soap acts as a surfactant, breaking down that waxy barrier. This simple addition helps the vinegar and salt mixture cling to the leaves instead of dripping away. Better contact means faster, more effective absorption, ensuring the weed gets the full dose.
We explore this same principle of improving how solutions interact with plants and soil in our guide on how to make liquid fertilizer, which you might find useful.
Ingredient Effectiveness Breakdown
To really understand how these simple ingredients become a powerful weed killer, let's break down what each one brings to the table.
, stripping waxy cuticles from leaves. Salt functions as a dehydrator, recommended as table salt or Epsom salt, disrupting root water absorption. Dish soap functions as a surfactant, recommended as biodegradable soap without bleach, breaking liquid surface tension to coat leaves.")
Putting these three together gives you a non-selective herbicide that works quickly on contact. It's a simple, effective tool for managing weeds in the right places around your homestead.
Mixing and Applying Your Homemade Weed Killer
Getting your weed killer mixed up is the easy part. But getting it to work? That comes down to precision. A few small tweaks in how you mix and when you spray can be the difference between weeds wilting in a few hours and needing to go back for a second round. Think of this as a targeted strike, not just a casual spray-down.
The most effective natural weed killer recipe I've found over the years boils down to a simple, powerful ratio. For every one gallon of horticultural vinegar, you’ll need one cup of salt and one tablespoon of basic dish soap. This mix is potent enough to knock down weeds fast without wasting ingredients.
Before you start, grab a garden sprayer that you can dedicate solely to weed killing. This is a non-negotiable for me. The last thing you want is to accidentally hit your prize-winning tomatoes with vinegar residue because you used the same sprayer for fertilizing.
This simple breakdown shows the right way to mix everything together.

Following this sequence is key. Start with the vinegar, then get the salt fully dissolved before adding the dish soap. If you add the soap too early, you'll end up with a foamy mess that's hard to work with.
Nailing the Application
Your timing and technique are just as critical as the recipe itself. The absolute best time to spray is midday on a hot, sunny, and still day. The sun acts like an accelerator, supercharging the vinegar's power to dry out the leaves.
Here are a few tips I've learned for getting the most out of every drop:
Get Close and Personal. Adjust your sprayer nozzle to a direct stream, not a fine mist. This minimizes drift onto plants you actually like and puts the solution right where it needs to be.
Soak the Leaves. Your goal is to coat the foliage until it's literally dripping. This ensures the dish soap has broken the leaf's surface tension, allowing the vinegar and salt to get in and do their job.
Use a Shield. For those stubborn weeds popping up next to your flowers or vegetables, a simple piece of cardboard makes a fantastic shield. Just hold it in place to block any overspray.
Remember, this is a non-selective herbicide. It doesn't know the difference between a dandelion and your prized rose bush. Careful, targeted application is essential to protect the plants you love while eliminating the ones you don’t. Wait for a calm day and take your time.
Using Your Natural Weed Killer Safely

Just because the ingredients in this weed killer are things you find in your kitchen doesn't mean you can get careless. That horticultural vinegar is potent stuff—it's highly acidic and demands a bit of respect. Before you even think about mixing it up, pull on a pair of gloves and some eye protection. An accidental splash can be a real pain, and this simple step prevents any issues with skin or eye irritation.
This spray is what we call non-selective, which is just a fancy way of saying it will knock back any plant it touches. If you’re spraying weeds that are creeping up on your prize-winning petunias or your tomato plants, you’ll need a shield. A simple piece of cardboard works perfectly. Just hold it up to block the overspray and make sure you only hit your intended targets. It’s a small step that saves a lot of heartache later.
Protecting Your Soil for the Future
Now, let's talk about the salt. It’s incredibly effective, but it doesn't just disappear. Salt builds up in the soil over time, eventually creating a patch of ground where nothing—not even the good microbes—will grow.
For that reason, I only use this specific recipe in places like driveway cracks, gravel paths, or between patio pavers where I have zero intention of planting anything, ever.
A salt-based weed killer is a strategic tool for hardscapes and non-planting zones. For garden beds or any soil you want to use later, stick to a salt-free alternative like a pure vinegar spray or even boiling water. This keeps your soil healthy and viable for the long haul.
What if you have an "oops" moment and spray it where you wanted to plant? You can help lessen the damage. Flush the area with water several times over a few days. This helps leach the salt deeper into the soil, moving it away from the root zone of any future plants.
This focus on soil health is becoming more common everywhere. In fact, the market for bioherbicides in the United States is expected to grow at a CAGR of 9.2% between 2025 and 2035, largely because people are paying more attention to preserving their soil. You can dig into the specifics in this detailed report on bioherbicides.
This same mindful approach to soil and plant health is just as important when dealing with garden pests. You can check out similar eco-friendly strategies in our guide to effective natural pest control.
Look, the vinegar and salt recipe is a workhorse, but it's not the right tool for every single job. Sometimes you need a different game plan, especially in spots where you plan to plant later and don't want to mess with your soil health for the long term.
For those stubborn weeds popping up in sidewalk cracks or between gravel pavers, one of the simplest and most effective salt-free options is just boiling water. Carefully pour it right onto the weeds, and it will scald them on contact. It's a fantastic, single-ingredient fix that leaves zero residue behind.
Another great alternative is a pure horticultural vinegar spray. When you leave out the salt, it won’t have that lasting impact on the soil, making it a much safer choice for clearing a weedy patch you want to turn into a new garden bed. Just remember, it's still non-selective and will damage any plant it touches.
Boosting Your Recipe for Tougher Weeds
Ever battled stubborn, waxy weeds like ivy or thistle that just seem to shrug off your first spray? I've been there. For those extra-tough jobs, you can supercharge your primary natural weed killer recipe by adding a booster.
A little bit of citrus or orange oil can make a huge difference. These oils act as a powerful degreaser, helping to break down the protective waxy coating on tough leaves far more effectively than dish soap alone.
Citrus Oil Additive: Mix in one teaspoon of concentrated orange oil per gallon of your spray.
Application: Make sure to shake the sprayer often as you work. This keeps the oil emulsified with the vinegar so every spray is just as potent as the first.
This small tweak helps the main ingredients penetrate faster and get to work on those really resilient weeds. It gives your homemade spray an extra edge right when you need it most.
This strategy of targeting a specific weakness is also a cornerstone of managing garden insects. To learn more, check out our guide on organic pest control for your vegetable garden.
Got Questions? Let's Talk Natural Weed Killer
Even with a simple recipe, it’s smart to have a few questions before you start spraying your yard. Getting the right answers upfront means you get the results you want without any guesswork. Let’s walk through some of the things people ask me all the time.
One of the first questions is always about speed. How fast does this stuff actually work? You should see weeds start to wilt and turn brown within 24 hours. This works best on a hot, sunny day—the heat and sunlight are your friends here, as they really speed up the drying process and bake the weeds.
Is It Safe? And Does It Really Work?
Safety is another big one, especially if you have kids or pets running around. While all the ingredients are common household items, you’ll still want to keep everyone off the treated area until the spray has completely dried. High-strength vinegar can be a mild irritant, so letting it dry first is just a good precaution. Once it’s dry, the area is fine to be on again.
People also wonder if this is a permanent fix. Think of this recipe as a contact herbicide—it kills what it touches. It’s incredibly effective on those annoying annual weeds with shallow roots that pop up everywhere.
For the really stubborn stuff like dandelions or thistle, it’ll kill the top growth but might not take out the deep root system on the first go. You’ll likely need to hit them a few more times to wear down the plant’s energy reserves and keep it from coming back.
Finally, the most critical question: where should I use this? Do not spray this recipe on your lawn. It’s non-selective, meaning it will kill your grass just as fast as it kills the weeds. This solution is tailor-made for places where you don't want anything growing, like the cracks in your sidewalk, a gravel driveway, or along a fence line. Using it in the right spot is the key to getting it right.


Facebook
Instagram
X
Youtube