
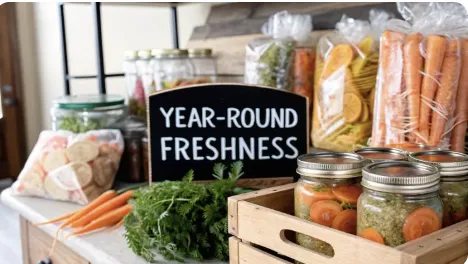
How to Preserve Carrots for Year-Round Freshness
How to Preserve Carrots for Year-Round Freshness
So you’ve got a mountain of carrots—maybe from a bumper crop in the garden or a great deal at the market. What now? The best way to preserve them really comes down to how you plan to use them and how long you need them to last.
For grabbing a few here and there for snacks or dinner, proper refrigeration is your best friend. If you're looking to stock up for the winter, freezing or traditional root cellaring are fantastic options. But if you’ve had a massive harvest and need something shelf-stable for a year or more, pressure canning is the gold standard for safety and longevity.
Why Mastering Carrot Preservation Matters

Knowing how to preserve carrots is more than just a kitchen skill. It’s a direct link to enjoying the fruits (or roots!) of your labor long after the growing season has wrapped up.
Whether you’ve got a small patch in your backyard or brought home a massive haul from the farmer's market, letting those vibrant, sweet roots go to waste is a genuine shame. Proper preservation locks in that earthy flavor and satisfying crunch, turning a fleeting harvest into a pantry staple.
This guide breaks down each method—from the simple to the advanced—into practical, no-fuss steps. We’ll cover how to prep your carrots to lock in their best flavor, texture, and nutrients, ensuring your hard work pays off down the road. You'll learn the secrets to keeping them crisp for weeks or safely tucked away for years.
For a broader look at how these age-old methods work across different foods, it's worth exploring timeless natural food preservation techniques.
What This Guide Will Cover
To give you a clear path forward, we’ve organized the techniques based on what you’re trying to achieve. Here’s a quick look at what we'll be covering:
Short-Term Storage: Perfect for keeping carrots fresh and ready for daily use. We'll get into the specifics of refrigeration and some simple root-cellaring hacks.
Long-Term Preservation: Ideal for a bumper crop. This section details freezing and pressure canning for year-round enjoyment.
Creative Methods: Fun ways to transform your carrots through pickling and drying, adding some unique flavors to your pantry.
Troubleshooting Tips: Real-world solutions for common problems like rubbery carrots, freezer burn, and canning mishaps.
To help you choose the right path for your harvest, here’s a quick comparison of the methods we’ll cover. Each one has its own strengths, depending on your goals, time, and storage space.
Carrot Preservation Methods at a Glance

Think of this table as your starting point. Now, let’s dive into the details of each technique so you can tackle that pile of carrots with confidence.
The ultimate goal is to make the most of every single carrot. By learning these methods, you're not just saving food; you're building self-sufficiency and connecting more deeply with the food you eat.
This guide is designed to empower you, whether you’re just starting your food preservation journey or you're a seasoned homesteader. And if you want to start at the very beginning, you can also explore our detailed advice on how to grow carrots to ensure you have the best possible harvest to work with.
Let's get started.
Short-Term Storage for Ready-to-Eat Carrots

If you just brought in a beautiful carrot harvest and plan to use them within the next month, short-term storage is your best friend. The goal isn't to keep them shelf-stable for a year; it’s all about locking in that satisfying crunch and keeping them ready for snacking, salads, or supper. We’ll cover the two best ways I’ve found to keep carrots raw, crisp, and far from that dreaded limpness.
For most folks, simple refrigeration is the go-to method. But there's a right way and a wrong way to do it. The biggest mistake? Tossing carrots into the crisper drawer with their leafy green tops still attached. Those greens are moisture thieves, actively pulling water right out of the root and turning your carrots soft in just a few days.
Mastering Refrigerator Storage
The very first thing you need to do—immediately after harvesting or bringing carrots home—is to trim the greens. I grab a pair of kitchen shears and snip the tops off, leaving about a half-inch of stem. Trust me, this single step makes the biggest difference for successful refrigerator storage.
Next, you have to manage moisture. Carrots love a cool, humid spot. You can create this perfect environment in a couple of ways:
The Water Bath Method: For the absolute crispest carrots, this is my favorite trick. Place your trimmed carrots (peeled or unpeeled, your call) in an airtight container and cover them with clean water. Seal it up and pop it in the fridge. This keeps them perfectly hydrated and ready to eat. Just be sure to change the water every 4-5 days to keep things fresh.
The Perforated Bag Trick: If you have a big batch, grab a perforated plastic bag. Place your unwashed, trimmed carrots inside. The holes allow for air circulation, which prevents the moisture buildup that leads to rot, while the bag itself maintains the humidity carrots crave.
One common mistake is storing carrots next to ethylene-producing fruits like apples or pears. That gas can make carrots taste bitter over time. Give your carrots their own space in the fridge if you can.
Creating a Root Cellar Vibe
You don’t need an actual cellar to get the benefits of one. The idea behind traditional root cellaring is to mimic the cool, dark, damp conditions of the earth. You can pull this off in a cool corner of your basement, a garage that doesn’t freeze, or even a chilly pantry.
First, find a sturdy container like a wooden crate or a big plastic bin. Cover the bottom with a few inches of a damp medium—sand, sawdust, or even peat moss all work great. You want the medium to feel like moist soil, not soaking wet.
Arrange a single layer of your unwashed, trimmed carrots on top of the medium, making sure they aren't touching each other. Then, cover them completely with another layer of your damp material. You can keep layering carrots and medium until the bin is full.
This method insulates the carrots, keeps humidity high, and blocks out all light. It will keep them firm and ready to use for up to four months. When you need some, just dig them out, give them a good scrub, and enjoy.
Long-Term Methods for Your Bumper Crop
When your garden blesses you with a truly massive harvest, short-term storage just won't cut it. This is when you turn to the powerhouse methods of long-term preservation: freezing and pressure canning.
These techniques transform your fresh carrots into pantry staples that will see you through the entire year. Freezing locks in that fresh-picked flavor and nutrients, making them perfect for dropping into winter soups and stews. Canning, on the other hand, creates shelf-stable jars that are ready to go at a moment's notice, freeing up precious freezer space.
The Secret to Perfectly Frozen Carrots
To freeze carrots successfully, there's one step you absolutely cannot skip: blanching. It’s a non-negotiable part of the process.
This quick boil-then-chill process halts the natural enzymes that would otherwise cause your carrots to lose their vibrant color, crisp texture, and sweet flavor over time in the freezer. Skip it, and you’ll likely end up with carrots that are dull, woody, and have an off-taste after just a few months.
The ideal blanching time really depends on how you've cut your carrots:
Sliced or Diced: These smaller pieces need just 2 minutes in boiling water.
Whole or Baby Carrots: Give these a full 5 minutes to make sure they're heated all the way through.

As you can see, after the quick boil, an immediate ice bath is crucial. This stops the cooking process cold, preserving that perfect texture you want.
Once they're chilled, drain the carrots thoroughly and pat them dry. Spread them on a baking sheet in a single layer to "flash freeze" for about an hour. This extra step is a game-changer—it prevents them from clumping into a solid block, letting you grab just the amount you need later on.
Safe Canning with a Pressure Canner
When it comes to canning carrots, safety has to be your top priority. Carrots are a low-acid vegetable, which means a simple water bath canner is not safe. It just doesn't get hot enough to kill dangerous bacteria spores like Clostridium botulinum, which can cause botulism.
The only scientifically proven safe method for canning carrots at home is with a pressure canner. It reaches temperatures of 240°F (116°C) or higher, ensuring your carrots are preserved safely for long-term, shelf-stable storage.
The process involves packing your prepared carrots—either raw or hot—into sterilized jars, covering them with boiling water, and processing them in the pressure canner according to USDA guidelines for your specific altitude.
If you're new to this method, it’s worth reviewing a detailed guide. For a solid foundation, check out our comprehensive post on canning vegetables for beginners.
Get Creative with Pickling and Drying

Sometimes, putting up carrots isn't just about stocking the pantry for winter—it's about turning a humble root vegetable into something entirely new. Pickling and drying are two of my favorite ways to get creative when I have a surplus that doesn’t need to be canned or frozen.
These methods transform the texture and flavor of carrots, giving you brand-new ingredients to play with in the kitchen.
Crafting Tangy Pickled Carrots
There's nothing quite like the zesty, addictive crunch of a pickled carrot. They're perfect for topping tacos, slicing into salads, or just adding a bright kick to a charcuterie board. It's a versatile technique that really lets you experiment.
You've got two main options here: fast refrigerator pickles or the more traditional shelf-stable canned version. Both begin with a good brine, but they diverge when it comes to processing and storage.
Refrigerator Pickles: This is the easy way in. Just pack your carrot sticks or coins into a clean jar, pour a hot brine over the top, let them cool, and pop them in the fridge. They're ready to eat in about 24 hours and will keep for weeks.
Canned Pickles: If you want jars for the pantry, you'll need to use a water bath canner to process them. It's a bit more involved, but the payoff is pickled carrots that are shelf-stable for up to a year.
My go-to brine is a simple 1:1 ratio of water and vinegar, with a little salt and sugar to round things out. After that, it's all about the spices. Dill, garlic cloves, coriander seeds, or a pinch of red pepper flakes for heat are all fantastic starting points.
Don't be afraid to experiment with your pickling spices. I once threw a star anise and a few black peppercorns into a jar, and the resulting flavor was incredible on a pulled pork sandwich. The best recipes often come from a little improvisation.
The Art of Drying Carrots
Dehydrating carrots is like magic—it concentrates their natural sweetness and earthy flavor into something totally different. Dried carrots are incredibly lightweight and take up almost no space, making them perfect for custom soup mixes or backpacking meals.
You can use a dedicated food dehydrator or even just your oven on its lowest setting. The trick is to slice your carrots uniformly thin so they all dry at the same rate. I like to make wafer-thin rounds, toss them with a bit of olive oil and salt, and dry them into savory "chips." Shredded carrots also dry quickly and rehydrate beautifully in soups and stews.
To really get the hang of this method, check out our full guide on how to dehydrate vegetables.
Whether you go for the tangy crunch of pickles or the concentrated sweetness of dried carrots, these methods are a fantastic way to add some delicious variety to your preserving efforts.
Solving Common Carrot Preservation Problems
Even with the best intentions, things can go sideways when you’re putting up carrots for the long haul. You pull a bag out of the fridge and find them floppy, or a batch from the freezer is covered in a layer of icy frost. Don't sweat it—these are common bumps in the road, and almost always fixable.
Most of the time, the trouble boils down to two things: moisture and air. Getting that balance right is the real secret, no matter which preservation method you’re using.
Fixing Refrigerator and Freezer Issues
One of the most common complaints I hear is about rubbery carrots from the fridge. That’s a classic sign of dehydration. If your carrots are just sitting in the crisper drawer without enough humidity, they lose water and go limp. The fix? Store them in a perforated bag to hold in some moisture, or for guaranteed crispness, submerge them completely in water inside an airtight container.
On the flip side, freezer burn on your frozen carrots is the exact opposite problem—it’s caused by too much air. When air sneaks into the freezer bag, it pulls moisture from the surface of the carrots, leaving behind those telltale white, icy patches that ruin the texture. Always, always squeeze as much air out of your freezer bags as you possibly can before sealing them shut.
Key Takeaway: Perfect carrot preservation is a balancing act. Refrigerated carrots need high humidity to stay crisp, while frozen carrots need zero air exposure to prevent freezer burn.
Troubleshooting Canning and Pickling
Once you get into canning and pickling, a whole new set of challenges can pop up. A frequent one is cloudy pickle brine, which can happen for a few reasons.
You might have used table salt instead of pickling salt. Regular salt has anti-caking agents that can make the liquid murky.
Hard water minerals can react with the brine and cause cloudiness.
Sometimes spices like garlic or peppercorns just naturally break down and release sediment.
Another make-or-break issue is a failed seal on a canned jar. If you don't hear that satisfying "ping" after processing, the lid didn't seal, and the contents are not shelf-stable. This is usually caused by a bit of food debris on the jar rim, a tiny nick in the glass, or not leaving the right amount of headspace. If a jar doesn't seal, you can either reprocess it immediately with a fresh lid or just stick it in the fridge and use it within a week.
At the end of the day, understanding how to control the storage environment is what separates a good harvest from a great one. Commercial growers, for instance, use controlled atmosphere storage—lowering oxygen levels to keep carrots fresh for months. This technique is proven to preserve carotene and sugar content, as you can see in these advanced carrot storage findings. While you can't build a C.A. room at home, the principle is the same: managing the environment is everything when it comes to keeping your carrots at their best.
Even with the best instructions, you're bound to have a few questions pop up when you're elbow-deep in a project. Think of this as your go-to spot for those little details that can make a big difference.
Let's tackle some of the most common questions I get about preserving carrots so you can keep moving forward with confidence.
Do I Have to Peel Carrots Before Preserving Them?
This is a great question, and my answer is: it depends entirely on what you're doing with them. There’s no single right way, but here’s how I handle it after years of trial and error.
For Freezing and Canning: Yes, I always peel. The carrot skin can turn bitter and tough during high-heat processing or a long freeze. Peeling them first gives you a much better texture and a sweeter, more consistent flavor down the line.
For the Fridge or Root Cellar: Definitely not. A good scrub is all they need. The peel acts as a natural protective layer, helping the carrot hold onto its moisture and stay firm for weeks, sometimes months.
When it comes to pickling, that's purely up to you. Most folks prefer the smoother texture of peeled pickled carrots, but leaving the skin on works just fine.
Why Is Blanching So Important for Freezing Carrots?
Blanching—that quick dip in boiling water followed by an ice bath—is the secret to freezing carrots that actually taste good later. It might feel like an extra step, but it's the one thing you absolutely shouldn't skip.
Here's why: blanching stops the natural enzymes in the carrots from doing their job. If you don't stop them, those enzymes will keep breaking down the carrot's flavor, color, and texture, even while it's frozen solid.
Skipping the blanching step is the #1 reason people end up with dull, woody-tasting carrots a few months after freezing them. It's a few minutes of work that pays off big in quality.
Can I Use These Methods for Baby Carrots?
You sure can! All the methods we've talked about work wonderfully for baby carrots, whether they're true young carrots from your garden or the pre-cut kind from the store.
They're especially great for pickling and canning since their uniform size makes them a breeze to pack neatly into jars. Just be sure to follow the same guidelines for whatever method you choose, maybe knocking a minute or two off the blanching time to account for their smaller size.
At The Grounded Homestead, we believe knowing how to put up your harvest is a key step toward a more self-sufficient and healthy life. For more tips, tricks, and homesteading inspiration, you can always find us at TheGroundedHomestead.com.


Facebook
Instagram
X
Youtube