
How to Start Seeds Indoors for a Perfect Garden
How to Start Seeds Indoors for a Perfect Garden
Starting seeds indoors isn’t just a nice little garden task—it’s the single most powerful advantage you can give yourself. Get this right, and you’re weeks ahead of the growing season with stronger, healthier plants than anything you could buy at a nursery.
This initial setup is where it all happens. It’s not just about buying supplies; it’s about creating a nurturing environment from scratch. Think of it as building the foundation for your entire garden.
Let’s go beyond a simple shopping list and dig into the "why" behind each piece of equipment.
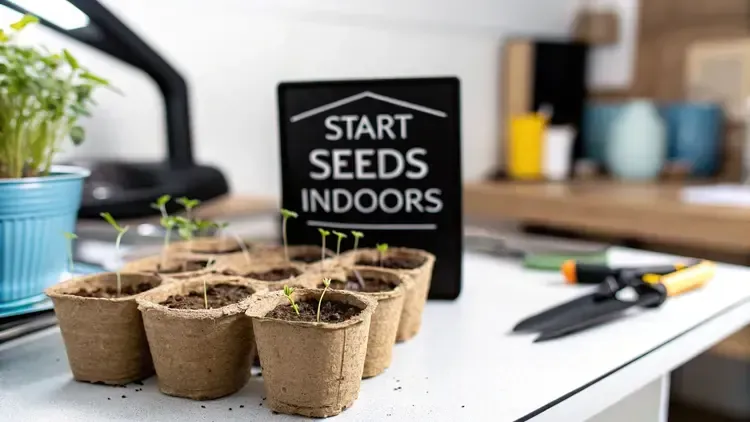
Choosing the Right Containers
Your first big decision is what you’ll plant your seeds in. This might seem minor, but the container you choose directly impacts watering, root health, and how easily your seedlings will handle being transplanted later on.
Plastic Cell Trays: These are the industry standard for a reason. They're reusable, uniform, and make managing light and water across dozens of seedlings a breeze.
Peat Pots or Pellets: A great biodegradable option. You plant the whole thing right in the garden, which drastically cuts down on transplant shock. The downside? They can wick moisture away from the soil, so you have to keep a close eye on them to prevent drying out.
Soil Blocks: My personal favorite for many plants. You use a special tool to form cubes of compressed soil mix. This method "air prunes" the roots, preventing seedlings from getting root-bound and encouraging a super robust root system.
Recycled Containers: Yogurt cups, egg cartons, and newspaper pots are fantastic, budget-friendly choices. Just make sure to poke drainage holes in the bottom and give them a good cleaning with a diluted bleach solution to kill off any lurking pathogens.
Selecting the Perfect Seed Starting Mix
Whatever you do, don't use soil from your garden to start seeds indoors. Garden soil is far too dense, compacts easily when watered, and is often loaded with weed seeds, pests, and fungal diseases like "damping off," which is fatal to young seedlings.
Your seedlings are like newborns—they need a sterile, nurturing environment to thrive. Using a dedicated seed starting mix is the best way to protect them from disease and give them the light, airy medium their delicate roots need to grow.
Look for a soilless mix that contains ingredients like sphagnum peat moss, perlite, and vermiculite. These mixes are lightweight, hold moisture perfectly, and provide the aeration that's critical for healthy root development. A quality mix is one of the best investments you can make for your garden.
A detailed approach to your garden setup can make all the difference, and our guide on garden planning for beginners can help you map out your entire season from seed to harvest.
The growing interest in controlled environment agriculture shows just how vital these foundational elements are. The global indoor farming market was valued at approximately USD 22.3 billion in 2024, with projections showing it could reach USD 47.2 billion by 2033. This boom is fueled by creating perfect conditions for light, moisture, and temperature—exactly what we're aiming to do on a smaller scale. You can explore more about the growth of indoor farming on imarcgroup.com.
Your Essential Seed Starting Supply Checklist
To get started on the right foot, here's a quick-reference table of the supplies you'll absolutely need. Think of this as your foundational toolkit for a successful indoor growing season.

Having these items ready before you plant your first seed makes the whole process smoother and much more enjoyable. It’s all about setting yourself—and your future plants—up for success.
Choosing and Preparing Your Seeds for Success

Your gardening adventure really begins the moment you pick up a seed packet. Think of that little envelope as a roadmap. Knowing how to read it is the key to getting your timing right for the entire indoor seed starting project.
You’ll want to look for two key phrases: "days to germination" and "days to maturity." The first tells you roughly how long it’ll be before you see a sprout, and the second estimates the time from planting to your first harvest.
More importantly, the packet will tell you when to start the seeds indoors. This is almost always framed as a number of weeks before your area's last frost date. For example, tomatoes and peppers often need a 6-8 week head start, while something like onions might need 10-12 weeks. This information is gold.
Decoding Your Planting Calendar
Everything—and I mean everything—revolves around your local climate. Your first job is to find your average last frost date. A quick online search for your zip code will give you this crucial piece of information. This date is your anchor point.
Once you have that date, just work backward. If your last frost is May 15th and your tomato seeds need an 8-week head start, you’ll be sowing them indoors around March 20th. This simple math keeps you from starting seeds too early (which leads to lanky, weak seedlings) or too late (which shortens your precious harvest window).
Your last frost date is the single most important piece of data for creating your indoor seed starting schedule. It dictates when you plant, when you harden off, and when you can finally get your plants in the ground.
Giving Stubborn Seeds a Nudge
Some seeds are tougher than others. They have hard, stubborn coats that need a little encouragement to sprout. A couple of simple prep techniques can mimic what happens in nature and dramatically boost your success rates.
For certain seeds with rock-hard outer shells, a technique called scarification works wonders.
What it is: Gently nicking or scratching the seed coat to let water in.
Seeds that benefit: Think morning glories, sweet peas, and lupines. They often have tough shells that repel water.
How to do it: You can gently rub the seed on a piece of sandpaper or carefully nick the coat with a nail file. Just be careful not to damage the inner seed.
Another common technique, stratification, gives seeds the winter chill period they need to wake up.
What it is: A period of cold, moist treatment.
Seeds that benefit: Lots of perennials like milkweed, lavender, and coneflowers require this cold spell to break dormancy.
How to do it: Mix the seeds with a small amount of damp sand or peat moss, pop them in a sealed plastic bag, and store them in your refrigerator for 4-8 weeks before you plan to plant.
These extra steps might seem a bit advanced, but they’re actually very simple. They unlock the potential of seeds that might otherwise fail, opening up a whole new world of plants you can confidently grow from scratch.
Creating the Perfect Light and Temperature Setup

Light and warmth are the lifeblood of healthy seedlings, and that sunny windowsill you're eyeing? It’s almost never enough. Seedlings need intense, direct light for 16 to 18 hours a day to grow strong and stout—something no window can provide, especially during the short days of late winter and early spring.
Without it, you get “leggy” seedlings. They stretch desperately towards the nearest light source, becoming pale, thin, and spindly. This weak growth creates flimsy stems that just can't support the plant later in life. This is why a dedicated grow light is one of the most important investments you can make when starting seeds indoors.
Finding the Right Grow Light
You don't need a professional, high-cost setup to get fantastic results. In fact, some of the most accessible options work exceptionally well for home gardeners. The goal is to provide full-spectrum light that mimics the sun.
Fluorescent Shop Lights: An affordable and surprisingly effective starting point. A simple T5 or T8 fluorescent fixture from a hardware store provides the right kind of light to grow stocky, healthy seedlings.
Full-Spectrum LEDs: These have become the go-to for many gardeners. While the initial cost is higher, LEDs use about half the electricity and last significantly longer than fluorescent bulbs, saving you money in the long run.
The key isn't just the type of light but its proximity to your plants. Your grow light should hang just 2-3 inches above the tops of your seedlings. You'll need to raise the light as they grow, maintaining this close distance to prevent them from stretching.
A common mistake is hanging the light too high. If your seedlings look tall and thin instead of short and bushy, they are begging for more intense light. Lower your fixture immediately to correct the issue.
The Importance of Warmth for Germination
While light is critical for growth after sprouting, warmth is the trigger that tells seeds it's time to wake up. Most seeds, especially heat-loving summer crops like tomatoes and peppers, germinate best when soil temperatures are consistently between 65-80°F (18-27°C).
This is where a seedling heat mat comes in. These waterproof mats sit under your seed trays and gently warm the soil, dramatically speeding up germination. I've seen pepper seeds sprout in a week on a heat mat when they might take three weeks at normal room temperature.
Once your seeds have germinated, you can remove the heat mat. Continued bottom heat can sometimes encourage fungal growth and isn't necessary for seedling development. At this point, a stable ambient room temperature is perfect.
The importance of a controlled environment is well-established. For instance, the market for smart indoor gardening systems, which automate light and temperature, is projected to hit USD 3.88 billion by 2032. These systems use technology to perfectly match conditions to a plant's needs, a principle we can apply on a smaller scale. You can find out more about the advancements in smart gardening on coherentmarketinsights.com.
By managing light and temperature, you're giving your seedlings the perfect head start.
Mastering Your Watering and Feeding Routine

Proper watering is an art, and it's where many new gardeners stumble when learning how to start seeds indoors. It's a delicate balance. Too much moisture creates the perfect breeding ground for damping off, a fatal fungal disease that rots stems right at the soil line. But too little water will stress your seedlings and stunt their growth.
The secret isn’t a rigid schedule; it’s about learning to read your plants' needs. Instead of watering from above—which keeps the soil surface soggy and practically invites mold—the best approach is bottom-watering.
The Bottom-Watering Method
This technique does more than just hydrate your plants. It encourages the roots to grow deep as they seek out moisture, creating a much stronger, more resilient seedling. It also keeps that top layer of soil dry, which is your best defense against fungus gnats and mold.
Here’s how to do it:
Pour about an inch of water into a solid, waterproof tray.
Place your seed-starting containers (cell trays, soil blocks, peat pots) directly into the water-filled tray.
Let them soak for 20-30 minutes. You'll see the soil absorb the moisture from the bottom up.
Once the soil surface looks visibly damp, remove the containers and let any excess water drain away completely.
You’ll know it’s time to water again when you lift the tray and it feels noticeably lighter. This hands-on method is far more reliable than just looking at the soil. For a more detailed guide, you can learn more about how to water seedlings on our blog.
Pro Tip: Allowing the soil surface to dry out a bit between waterings is actually a good thing. It forces the roots to grow downward in search of water, building a robust root system that will serve the plant well once it's transplanted outdoors.
Knowing When to Start Feeding
Your seed-starting mix provides all the nutrients a seedling needs for its first few weeks of life. That first set of leaves you see—the cotyledons—also contains a packed lunch straight from the seed itself. You don’t need to add any fertilizer until the plant develops its first set of “true leaves.”
These true leaves will look like miniature versions of the adult plant's foliage. Once you spot them, it’s a clear signal that the seedling has used up its initial reserves and is ready for its first real meal.
Start with a balanced, all-purpose liquid fertilizer, but be sure to dilute it to one-quarter or one-half strength. Full-strength fertilizer can easily burn the delicate new roots of your seedlings. Feed them with this weak solution about once a week, and they’ll have the consistent, gentle nourishment they need for steady, healthy growth.
Hardening Off and Transplanting Like a Pro
You’ve spent weeks babying your seedlings indoors, and now it’s almost time for the big move. This is where many new gardeners stumble. You can't just take your pampered seedlings from their cozy windowsill and toss them into the great outdoors. They aren’t ready for the real world of direct sun, wind, and fluctuating temperatures.
This transition is called hardening off, and skipping it is a recipe for disaster. Without this gentle introduction, your plants will go into shock, which can stunt their growth or even kill them outright.
The whole point is to gradually acclimate your plants over a 7 to 14-day period. Think of it as a slow and steady workout, toughening up the plant's cell walls and building resilience for the garden. Start by setting your seedlings in a sheltered, shady spot—like a covered porch or under a patio table—for just an hour or two on the first day.
Your Hardening-Off Game Plan
Every day, you’ll want to extend their outdoor time and slowly introduce them to more direct sunlight. A slow, methodical approach is always better than rushing it. Keep a close eye on your plants. If you see any wilting or pale, bleached-out leaves, you’re moving too fast. Just dial back their exposure for a day or two.
Here’s a sample schedule you can tweak based on your weather and your plants' response:
Days 1–2: Find a spot in full shade and leave them out for 2–3 hours.
Days 3–4: Move them to a location with dappled or filtered sunlight for 4–5 hours.
Days 5–6: Let them catch a few hours of gentle morning sun, extending their time outside to 6–7 hours.
Days 7–10: They should now be ready for most of the day in full sun. Bring them back inside at night.
Days 11–14: If your nighttime temperatures are consistently mild, it's time to let them stay out overnight to fully acclimate.
This careful process isn't just for backyard gardeners. The commercial indoor farming industry, valued at an estimated USD 42.08 billion in 2024, relies on similar principles to make sure seedlings are strong enough for large-scale systems. Getting these early stages right is crucial. You can find more data on the indoor farming market on grandviewresearch.com.
The secret to successful transplanting is all about minimizing shock. By hardening off properly and picking a calm, overcast day or late afternoon to plant, you give your seedlings the absolute best chance to settle into their new home without skipping a beat.
Making the Final Move to the Garden
Once your plants are fully hardened off, it's transplanting time. Give your seedlings a good drink of water about an hour before you plan to move them; this helps the root ball slide out of the container more easily.
To get a seedling out, gently squeeze the sides of its container and tip it upside down, cupping the plant and soil with your other hand. Whatever you do, never pull a seedling out by its stem. That’s a sure way to cause damage.
Dig a hole in your prepared garden bed that’s just a bit larger than the seedling’s root ball. Set the plant in the hole, making sure the top of its root ball is level with the surrounding soil. For vining plants like tomatoes, you can actually bury a good portion of the stem—this encourages it to sprout extra roots, making for a sturdier plant.
After you’ve positioned the plant, backfill the hole with soil and gently firm it around the base. The final step is to water deeply right away. This helps settle the soil, gets rid of any air pockets around the roots, and gives your plant a much-needed drink as it starts its new life. This same gentle handling is just as important for perennials, like if you want to start with strawberries that are a garden fruit that grows back, ensuring they establish well for years of harvests.
Even the most seasoned gardener runs into trouble when starting seeds indoors. Seedlings are just plain delicate, and a small oversight can quickly snowball into a big problem. Don't worry—most issues are easy to fix once you know what to look for. Think of this as your troubleshooting guide to get those little green shoots back on track.
One of the most common sights is seedlings that are super tall and skinny. This classic problem, known as being "leggy," is almost always a sign that your plants are desperate for more light. They're literally stretching themselves thin trying to find it.
The fix is usually simple: get your grow light much closer to your plants. You want it just 2-3 inches above the tops of the leaves.
Another headache I see all the time is a fuzzy white growth or mold on the surface of the soil. This is a dead giveaway that you're overwatering and don't have enough air moving around. While it's rarely fatal on its own, it creates the perfect damp conditions for more serious fungal diseases to take hold.
The best way to beat back mold is to stop watering from the top. Switch to bottom-watering and let the soil surface dry out between waterings. Adding a small, inexpensive fan to gently circulate air across your trays makes a world of difference.
Diagnosing and Fixing Seedling Ailments
Sometimes, the clues are more subtle. Your seedlings might just... stop growing. Or maybe their leaves are turning a weird color. These are signs that something in their environment is off. Yellowing leaves, for example, often point to a nitrogen deficiency. This is your cue to start feeding them with a half-strength liquid fertilizer.

The image above shows the key signs that it's time to transplant, which is another crucial step to prevent problems like becoming root-bound. You're looking for at least two sets of true leaves and healthy roots filling the cell.
Common Seedling Problems and Solutions
Navigating the early days of a seedling's life can feel like a guessing game. To make it easier, here’s a quick-glance table to help you diagnose and solve the most frequent issues I've encountered over the years.

Learning to read these early signs is a skill that turns frustrating failures into valuable experience. With this guide, you can catch most problems before they become serious and keep your indoor garden thriving.
At The Grounded Homestead, we believe that growing your own food is one of the most rewarding skills you can learn. Our goal is to provide the knowledge you need to succeed, from your first seed to your final harvest. For more tips, guides, and inspiration on your homesteading journey, visit us at https://thegroundedhomestead.com.


Facebook
Instagram
X
Youtube