
DIY Rainwater Harvesting System
DIY Rainwater Harvesting System
Taking on a DIY rainwater harvesting system is one of the most practical ways to get a handle on a key resource. It’s a free, sustainable water source for your garden and other outdoor needs—a truly empowering step toward self-sufficiency that you can scale to almost any budget or home.
Why You Should Build a Rainwater System
Thinking beyond the simple idea of "saving water," building your own collection system unlocks a handful of real, tangible benefits. Right away, you’ll see a drop in your monthly utility bills, especially during those dry summer months when garden watering can make your meter spin. This isn't just about being green; it's a smart financial move.
Every time it rains, you're catching a valuable resource that is naturally soft and free of the chlorine and other chemicals found in municipal water. Plants absolutely thrive on it. You’ll also notice it's perfect for washing your car without leaving spots or for any other outdoor cleaning task. Honestly, the sense of security you get from managing your own water supply is a powerful reward in itself.
Positive Environmental Impact
Your DIY project creates a positive ripple effect right in your local ecosystem. By capturing rainfall where it lands, you dramatically cut down on stormwater runoff. This helps prevent two huge issues in urban and suburban areas:
Soil Erosion: Uncontrolled runoff can easily strip away valuable topsoil from your yard and public spaces.
Water Pollution: As it flows over driveways and lawns, stormwater picks up pollutants like fertilizers, pesticides, and oil, carrying them straight into local streams and rivers.
When you manage runoff on your own property, you become an active steward of your local watershed. It’s a small action with a meaningful, positive impact on environmental health.
A Global Perspective on Water Conservation
The need for alternative water sources is becoming more urgent across the globe. Water scarcity already impacts over 2 billion people, and that figure is projected to climb as global water demand is expected to surge by up to 30% by 2050. This growing pressure on conventional water supplies is exactly why governments are increasingly promoting rainwater harvesting as a viable solution, often providing incentives for homeowners. You can dig into more of these global water trends and market growth stats over at Verified Market Research.
This project connects you to a much larger movement of sustainable living and resource management. It’s a core piece of creating a more resilient home, and it aligns perfectly with other self-sufficiency skills. If this idea gets you fired up, exploring more backyard homesteading ideas can open up a whole world of possibilities for living more sustainably, right where you are.
How to Plan Your System Size and Location

Before you buy a single fitting or drill a single hole, let’s talk strategy. Jumping into a rainwater harvesting system diy project without a good plan is a classic recipe for frustration. The best systems I've seen aren't just slapped together; they're thoughtfully sized and placed to match the home and the owner's needs.
Getting this part right from the start means you’ll collect the water you need without ending up with a system that's too big for your space or too small for your garden. The good news? It all boils down to two simple questions: How much water can you realistically collect, and how much do you actually need?
Calculate Your Collection Potential
Your roof is the star of the show here—it’s your primary collection surface. So, the first piece of the puzzle is figuring out its size. Don't worry, you don’t need to get up on a ladder with a tape measure. A good-enough estimate comes from the ground: just measure the length and width of your house to get its basic "footprint."
There’s a simple formula that gives you a surprisingly accurate idea of your potential harvest:
Roof Area (sq. ft.) x Annual Rainfall (inches) x 0.623 = Total Gallons Per Year
That 0.623 isn't just a random number. It's a handy conversion factor that translates one inch of rain falling over one square foot directly into gallons.
Let's run a quick, real-world scenario. Say your home has a 1,500 square foot footprint, and your area gets a decent 30 inches of rain a year.
1,500 sq. ft. x 30 inches x 0.623 = 28,035 gallons
That’s a mind-boggling amount of water hitting your roof every year. Even capturing a fraction of that can make a huge dent in your water bill and give your garden everything it needs. This kind of thinking is catching on everywhere; the market for rainwater harvesting systems was valued at around $110.61 million in 2025 and is expected to grow by nearly 10.74% annually through 2033 as more homeowners look for sustainable water sources. You can find more on this trend in this comprehensive market report.
To help you visualize this on a more practical, month-to-month basis, here’s a table that breaks down the potential. Just find your local average monthly rainfall and your roof size to get a ballpark figure.
Estimated Monthly Water Collection Potential

Remember, this is your potential collection. Factors like roof material and evaporation mean you won't get every single drop, but it’s a powerful starting point for planning your storage.
Determine Your Actual Water Needs
Knowing you could capture 28,000 gallons is one thing, but how much do you really need to store? This is where you get honest about your goals. Your actual water usage will point you toward the right-sized tank.
Think about what you'll use the water for:
Small-Scale Use: Just watering a few porch pots or a small herb garden? A single 55-gallon barrel is likely all you need.
Medium-Scale Use: Got a decent-sized vegetable garden or a few flower beds? Linking two or three barrels for 110-165 gallons of storage might be the sweet spot.
Large-Scale Use: If you're aiming to irrigate a substantial garden, wash your cars, or top off a small pond, you'll want to explore larger tanks, maybe in the 250-500 gallon range.
A common mistake is going out and buying the biggest tank you can find without thinking about your actual usage. Start by estimating what your garden needs weekly, then size your storage to bridge the gap between rainfalls.
Scout the Perfect Location
Okay, final step in the planning phase: finding the right home for your barrel or tank. A good location makes everything—installation, use, and maintenance—so much easier. Take a walk around your house and scout for a spot that checks these three boxes.
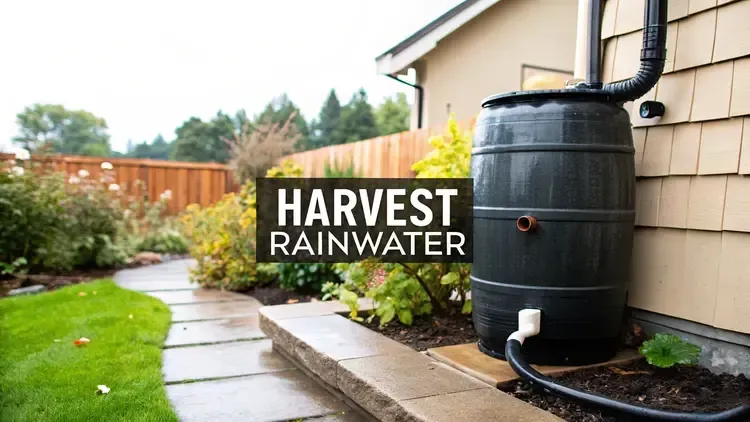
1. Right Next to a Downspout This is non-negotiable. Your barrel needs to be directly beside a downspout to capture water. The closer it is, the less piping or diverter hose you'll need, which means fewer chances for leaks and a cleaner look.
2. A Stable, Level Foundation Water is seriously heavy. A full 55-gallon barrel weighs over 450 pounds. The ground underneath it has to be solid and perfectly level. A wobbly base isn't just unstable; it's a safety hazard. A pad of concrete blocks or compacted gravel makes a fantastic, durable foundation.
3. Easy Access for You You'll need to get to the spigot to fill your watering can, check the filter for leaves, and occasionally give the inside a good cleaning. Don't shove your barrel into a tight corner where it's a pain to reach. Make sure you have enough room to work around it comfortably.
Choosing the Right Parts for Your Build

With a solid plan in hand, it’s time for the fun part—gathering your supplies. Walking into a hardware store can feel like stepping into a sea of options, but knowing exactly what you need turns the trip from a chore into a focused mission.
This isn’t about buying the most expensive gear on the shelf. It’s about making smart, informed choices that balance cost, durability, and function. The parts you choose here will directly impact your system's efficiency and how long it lasts. Let's break down everything from the storage tank to the smallest spigot so you can build a reliable system.
Selecting Your Water Storage Tank
The rain barrel or tank is the heart of your system, and it’s likely your single biggest investment. Your choice really comes down to your budget, how much space you have, and your water goals.
The most common starting point for a DIY setup is the classic 55-gallon plastic drum. They’re affordable, easy to find, and simple to modify. When you're sourcing one, it is absolutely critical to make sure it's made from food-grade plastic. These barrels were originally used to store things like juice concentrate or pickles, which means the plastic itself won't leach harmful chemicals into your water.
Stay far away from barrels that previously held industrial chemicals, oils, or soaps. They can never be cleaned well enough for this purpose.
For those with bigger plans, larger polyethylene tanks are the next step up. These are specifically designed for water storage, come with built-in UV resistance to prevent plastic breakdown, and are often made in opaque colors (like black or dark green) to block sunlight and stop algae from growing inside.
Storage Option Comparison

Bottom line? A recycled food-grade barrel is a fantastic, budget-friendly start. If you have serious irrigation plans for a large garden, investing in a purpose-built tank is a smart long-term move.
Your First Line of Defense: Debris Management
Clean water starts at the top—at your gutters. Before water even hits your downspout, you want to stop leaves, twigs, and other gunk from getting into the system. A clogged system is an inefficient one, and it's a real headache to clean out.
Your first and easiest defense is a simple gutter guard. These mesh or screen inserts sit right on top of your gutters and do a surprisingly good job of keeping the big stuff out. They're inexpensive and you can usually install them in an afternoon.
The next critical component is a first-flush diverter. When it first starts to rain, that initial "first flush" of water washes all the accumulated dust, pollen, bird droppings, and small debris off your roof. You definitely don't want that concentrated mix going straight into your tank.
A first-flush diverter is a simple but brilliant device. It's a chamber that captures the first few gallons of runoff. Once the chamber fills, a ball float seals the entrance, and all the subsequent, cleaner rainwater is then directed into your barrel. This single component dramatically improves your water quality.
Filters, Fittings, and Fixtures
With the big pieces sorted, it's time to focus on the smaller parts that connect everything and make the system truly functional. These are the nuts and bolts—literally—of your build.
Inlet Screen: Your barrel needs a screen over its main inlet hole to catch any stray debris that made it past your gutters and first-flush diverter. A simple piece of fine metal or plastic mesh, secured tightly, works perfectly. This is also your primary defense against mosquitos looking for a place to lay eggs.
Spigot/Tap: This is how you'll get water out. A standard brass or plastic spigot with a regular hose connection is all you need. Here's a pro tip: install it a few inches from the bottom of the barrel. This leaves a small space for any fine sediment to settle without ever clogging your tap.
Overflow Outlet: This is a non-negotiable safety feature. You must have a dedicated overflow pipe or hose fitting installed near the top of the barrel. When your tank is full, this outlet directs excess water safely away from your home's foundation, preventing potential water damage.
Pipes and Hoses: You'll need the right piping or a flexible hose to connect your downspout diverter to the barrel's inlet. Choose a size that matches your diverter's outlet for a snug, leak-free fit.
Choosing the right components is a hands-on process that sets the stage for a successful system. By focusing on quality, food-safe materials and smart debris management from the start, you’ll build a setup that provides clean, free water for years to come.
Your Guide to Assembling the System
Alright, this is where the fun starts. With your plans laid out and all the parts in hand, it's time to bring this rainwater harvesting system diy project to life. All that careful prep is about to pay off. We'll build this thing from the ground up, making sure every connection is solid and every piece does its job.
Just a quick reminder: safety first. Wear glasses when you’re drilling or cutting, and throw on some gloves. Now, let's get to it.

As you can see, the process flows logically from one step to the next. Get the base right, connect it to the source, prep your storage, and you're well on your way to an efficient system.
Building a Rock-Solid Foundation
First things first: your rain barrel or tank needs a stable, level base. This is non-negotiable. Water is shockingly heavy—a full 55-gallon barrel weighs over 450 pounds. If that base is soft or uneven, you're creating a serious safety hazard.
Your foundation has to be perfectly level. I mean, pull out a level and check it from every angle. Even a slight tilt puts a ton of stress on the barrel and its fittings, which is a recipe for failure down the road.
The easiest way to build a solid base is with concrete cinder blocks or heavy paving stones. This does two things for you: it gives you a sturdy, flat surface and it elevates the barrel. Raising it up a foot or two uses gravity to increase the water pressure at your spigot, making it way easier to fill a watering can or use a short hose.
Building a strong base is not a step to rush. I've seen systems fail because the ground underneath settled, causing a full barrel to lean dangerously. Taking an extra 30 minutes to compact the ground and perfectly level your blocks will save you major headaches later.
Modifying the Gutter and Downspout
Next up, we need to tap into your water source—the downspout. We’ll do this by installing a downspout diverter. It's a clever little piece that sends rainwater into your barrel but lets debris and overflow continue down the pipe like normal.
Start by setting your rain barrel on its new foundation, right where it will live. Mark the downspout at the same height as the barrel’s inlet hole; this is your cutting line for the diverter. Most diverter kits have clear instructions to guide your cuts.
Use a hacksaw to carefully cut the downspout. For the cleanest, straightest cuts, it’s often easier to pop the downspout off the wall and cut it on a sawhorse or the ground. Once cut, file down any rough metal edges to get a tight, clean fit for the diverter.
Install the diverter following the manufacturer’s directions, sealing it with silicone caulk if they recommend it. The last piece is the flexible hose that connects the diverter to your barrel’s inlet screen.
Prepping the Rain Barrel for Service
Your barrel is pretty simple—it just needs three holes: an inlet for water coming in, a spigot for water going out, and an overflow for when it gets too full.
The Inlet: This one goes on top of the barrel. It should be just big enough for the diverter hose to fit snugly. Make sure you cover it with a fine mesh screen to keep leaves out and, more importantly, to stop mosquitos from turning your water supply into a nursery.
The Spigot: Drill a hole for your spigot (or tap) a few inches from the bottom of the barrel. This placement is strategic—it lets any fine sediment settle below the tap so it doesn't clog your spigot. Wrap the spigot's threads with Teflon tape and use rubber washers inside and out to guarantee a watertight seal.
The Overflow Valve: This is your system’s most important safety feature. Drill a hole for the overflow fitting near the very top of the barrel, ideally on the opposite side from the inlet. Attach a hose here to direct any excess water safely away from your house’s foundation. Send it to another garden bed or a drainage area.
Linking Multiple Barrels for More Storage
Want to capture even more of that free water? Linking barrels together is a simple and effective upgrade. All you need are a few short hoses and bulkhead fittings to connect the barrels near the top.
Drill holes at the same height near the top of each barrel. Install the bulkhead fittings and connect them with a short, flexible hose. When the first barrel fills, the water will automatically flow into the second, then the third, and so on. Only the very last barrel in the chain needs an overflow outlet. For convenience, you can put the main spigot on the first barrel.
All this collected water is a game-changer for the garden. If you really want to put it to good use, check out our guide on how to build a DIY drip irrigation system that can run perfectly off the gravity-fed pressure from your new barrel system.
Keeping Your System Clean and Functional

You’ve built your rainwater harvesting system, and it’s a beautiful thing. But the real work—the part that turns a weekend project into a long-term asset—starts now. Just like a garden, your system needs a little tending to stay healthy and productive for years to come.
A bit of simple, consistent maintenance is the secret to keeping your water clean and your gear in top shape. It prevents the clogs, leaks, and grime that can turn a great setup into a headache. Think of it as protecting your investment of time and money.
Your Routine Maintenance Checklist
Staying on top of maintenance doesn't require a rigid schedule. Just make a habit of checking these key spots seasonally, especially before and after the rainiest parts of the year. Most of these tasks only take a few minutes but make a world of difference.
Gutters and Screens First: This is your first line of defense against gunk. At least twice a year—once in the spring and again after the autumn leaves fall—get up there and clear out your gutters. While you're at it, give the inlet screen on top of your barrel a quick clean to remove any trapped leaves or debris.
Inspect All Your Connections: Take a quick walk-around and eyeball your downspout diverter, hoses, spigot, and any overflow fittings. You’re just looking for drips, cracks, or signs of wear. Catching a small leak now means you can fix it with a bit of silicone caulk or a new washer, long before it becomes a major failure.
Keep the Overflow Path Clear: Your overflow is a critical safety valve. Make sure the end of the hose is unobstructed and pointing to a safe drainage area, well away from your home's foundation. It’s easy for mulch, soil, or leaves to block the outlet, which can cause water to back up.
This kind of local water management is becoming more than just a hobby; it’s a necessity. In regions facing serious water stress, from Latin America to the Middle East, these DIY systems are critical. For example, with roughly 59% of Brazil experiencing drought from 2023 to 2024 and Saudi Arabia facing absolute water scarcity, decentralized solutions like rainwater harvesting are vital. You can dig deeper into these global trends with this detailed market analysis from IMARC Group.
How to Keep Your Stored Water Fresh
Stagnant water invites two things you definitely don’t want hanging around your yard: algae and mosquitos. Luckily, keeping them out of your barrel is incredibly simple and doesn't require any harsh chemicals.
Your best weapon against algae is darkness. Algae needs sunlight to grow, which is why opaque, dark-colored barrels are the gold standard. If you’re repurposing a lighter-colored or translucent barrel, just give it a coat of dark paint or build a simple screen around it to block the light.
For mosquitos, the fix is just as easy. Make sure your inlet screen is secure with no gaps. For extra peace of mind, dropping a mosquito dunk into your barrel every 30-60 days is a cheap and highly effective trick. These dunks release a naturally occurring bacterium that only targets mosquito larvae and is completely safe for your plants.
Prepping for the Seasons
Your maintenance rhythm will change a bit with the seasons, especially if you live somewhere that gets freezing winter temperatures.
Winterizing Your System: If you get hard freezes, winterizing your system is non-negotiable. Skip this, and you risk a cracked barrel and broken fittings come spring.
Drain the barrel and all connected hoses completely.
Leave the spigot in the "open" position. This prevents any trapped water from freezing and expanding inside the valve.
Switch your downspout diverter back to its original setting, bypassing the barrel entirely. You want all that winter rain and snowmelt to follow its normal path.
Flip the empty barrel upside down or cover it to keep it clean and dry until spring.
Taking care of this small seasonal chore guarantees your setup will be ready to start collecting water as soon as the first spring rains arrive. Proactive upkeep is what will make your DIY system last.
Still Have Questions? Let's Talk Rainwater Systems
Even with a good blueprint in hand, jumping into a rainwater harvesting system diy project can feel like there are still a few loose ends. It's totally normal to wonder about the finer points—the what-ifs, the legal stuff, and the practical day-to-day details of your new setup.
Getting those last few questions answered is what turns a good plan into a great project. So, let’s clear up some of the most common things people ask right before they start building.
Can I Drink the Water I Collect from My Roof?
This is a big one, and the short, safe answer is no, not without some serious filtration. The water that rolls off your roof and into your barrel is a fantastic resource for everything but drinking.
It's naturally soft and free of the chlorine you'd find in city water, making it perfect for your garden, washing the car, or hosing down muddy tools. Your plants will absolutely love it.
But for drinking? That water has picked up a few things on its journey. It can carry a cocktail of contaminants, including:
Air pollutants from the atmosphere.
Bird droppings, dust, and decomposing leaves.
Tiny particles from your roofing material.
To make that water potable (safe to drink), you'd need a multi-stage purification system that includes sediment filters, activated carbon, and a UV sterilizer to handle bacteria and viruses. That's a whole different level of setup, well beyond a basic DIY barrel system.
Do I Need a Permit to Collect Rainwater?
This really depends on where you hang your hat. The rules around rainwater harvesting can change dramatically from one state, county, or even city to the next. In many places, setting up a simple rain barrel is perfectly fine and even encouraged.
However, some areas—especially arid regions with complicated water rights laws—might have specific regulations. These rules could limit the size of your storage tank or how you're allowed to use the water you collect. On top of that, some Homeowners' Associations (HOAs) have their own rules about what your system can look like.
The best thing you can do is make a quick call to your local city or county building department before you buy a single part. A five-minute chat can save you a world of headaches and make sure your project is good to go from day one.
What Happens When My Rain Barrel Fills Up?
A well-designed system has a simple, built-in answer for this: an overflow. If you didn't have one, a full barrel would just spill over the top, creating a soupy mess right next to your home's foundation. That's a recipe for erosion and potential water damage.
Your overflow outlet is a critical safety feature. You'll install it near the very top of the barrel. Once the water level hits that point, any extra rain is safely channeled away through an attached hose or pipe.
You can get clever with this overflow, too. Route it to another part of your garden, a thirsty tree, or a dedicated drainage area. It’s all about making sure every drop is managed, even in a downpour. This kind of smart resource management is a core principle of self-sufficient living. If you're drawn to this lifestyle, you might find our guide on homesteading for beginners a great place to get more ideas.
How Much Does a Basic DIY System Cost?
One of the greatest things about a rainwater harvesting system diy project is that you can scale it to fit just about any budget. You absolutely do not need to spend a fortune to get started.
You can often build a very basic, effective setup for between $50 and $150. This typically covers a recycled 55-gallon food-grade barrel, a simple spigot, a few fittings, and a downspout diverter. With a little hunting on local online marketplaces, you can often find used barrels from food distributors for a steal.
Of course, the price goes up as you get fancier. A brand-new, larger tank, a sophisticated first-flush diverter, or a pump to add water pressure will increase the cost. But the beauty of the DIY approach is that you're in complete control of the budget.
At The Grounded Homestead, we believe in empowering you with the knowledge to create a more sustainable and self-sufficient life. To continue your journey with practical tips and guides, visit us at https://thegroundedhomestead.com.


Facebook
Instagram
X
Youtube