
Canning Green Peppers: Easy Guide to Preserving Peppers
Canning Green Peppers: Easy Guide to Preserving Peppers
Of course you can. Canning green peppers is one of the best ways to lock in that fresh-from-the-garden flavor for the rest of the year. The whole process is pretty straightforward: you prep the peppers, pack them into jars, and use a pressure canner to make them shelf-stable and safe to eat.
Trust me, the taste is worlds away from anything you can buy at the store.
Why You Should Start Canning Green Peppers
Picture this: it's a cold, gray day in the middle of winter, but you open your pantry and see a row of vibrant green peppers, ready to bring a burst of summer to whatever you're cooking. That feeling of satisfaction is exactly why so many homesteaders and gardeners get into canning. It’s not just about saving food; it's about building a more resilient kitchen and really connecting with what you eat.
Canning gives you total control. You skip the preservatives and extra sodium you find in so many store-bought products. It’s a rewarding weekend project, and once you get the hang of it, having a stash of ready-to-use peppers makes getting dinner on the table so much easier.
Benefits of a Well-Stocked Pantry
There's a real peace of mind that comes with having a pantry full of home-canned goods. It's a solid step toward self-sufficiency and cutting down on food waste.
Cost Savings: Putting up produce when it's at its peak season is always cheaper than buying it months later when it's been shipped across the country.
Flavor Control: You get to decide what goes in the jar. Want them plain in water for soups and stews? Go for it. Prefer a seasoned brine for fajitas? You can do that, too.
Nutrient Preservation: While any heating process causes some nutrient loss, canning does a great job of preserving a good portion of the vitamins and minerals.

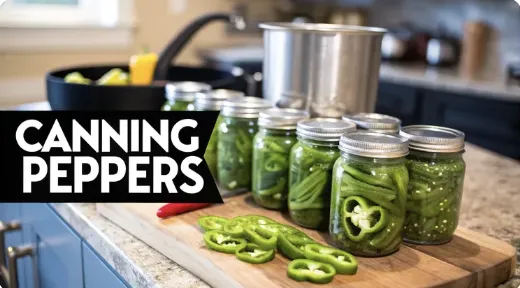
This photo gives you a good look at the kind of peppers we're talking about. Notice their thick walls and firm texture—that's exactly what you want. Those traits help them hold their shape and not turn to mush during the pressure canning process.
The real magic of canning green pepper is unlocking the ability to enjoy your garden’s bounty on a cold Tuesday in February. It transforms a simple vegetable into a pantry staple that's ready for fajitas, soups, or omelets at a moment's notice.
And it’s not just home canners taking notice. The global green pepper market is expected to grow from USD 5.8 billion in 2025 to USD 9.1 billion by 2035, largely because of their popularity in sauces and ready-to-eat meals. You can explore more insights about this growing market if you're curious.
Getting Your Canning Gear in Order
Before we even think about washing a single pepper, let's talk about gear. Getting your tools lined up first is what separates a smooth, successful canning day from a frantic, stressful scramble. More importantly, using the right equipment is the absolute cornerstone of safe food preservation, especially when we’re working with green peppers.
The single most critical piece of equipment is your pressure canner. Let’s be perfectly clear: for low-acid foods like green peppers (when they aren't pickled), a pressure canner is non-negotiable. A standard water bath canner just can't get hot enough. It will never reach the 240°F (116°C) required to kill off botulism spores. This isn't a friendly suggestion; it's a food science rule that keeps your family safe.
The Core Canning Kit
Beyond the canner itself, a few other items will make your life so much easier and safer. Think of these as the supporting cast that makes the whole operation run smoothly.
You'll need proper canning jars—often called Mason jars—that are built to handle high heat and pressure. Give every jar a quick inspection for nicks or cracks before you start. For each jar, you must use a brand-new lid. That fresh, unused sealing compound is what guarantees a strong, airtight seal. The screw bands, or rings, can be reused as long as they aren't bent or rusty.
I strongly recommend picking up a basic canning kit. They're inexpensive and usually include:
Jar Lifter: This tool is your best friend for moving hot, heavy jars in and out of the canner without burning your hands. Seriously, don't skip this.
Wide-Mouth Funnel: It pops right into the jar opening, preventing spills and keeping the jar rims perfectly clean, which is crucial for a good seal.
Headspace Tool: This little notched ruler helps you measure the exact amount of space to leave at the top of the jar. Most also have a flat end to help you poke out air bubbles.
My first few times canning, I tried to "make do" without a jar lifter and funnel. I ended up with a mess on the counter, a minor burn on my hand, and a couple of jars that didn't seal. Don't be like me—these simple tools are worth every single penny.
Finding Your Gear on a Budget
Getting started doesn't have to break the bank. While the pressure canner is an investment, you can often find great deals on the other supplies.
Check out local thrift stores or garage sales for canning jars—just be sure to inspect them carefully for any damage. Many hardware and grocery stores sell complete canning tool kits for a reasonable price, especially around harvest season. Remember, this initial setup cost pays for itself over and over with a pantry full of delicious, home-canned food.
How to Select and Prepare Your Peppers

The success of your canned green peppers starts long before the jars hit the water bath. It begins at the market or in your garden with the peppers you choose. The quality of what you put in the jar is a direct reflection of the ingredients you start with.
When you're picking them out, look for peppers with firm, thick walls and glossy, unblemished skin. A pepper that feels heavy for its size is a good sign—it usually means it has thicker flesh, which is exactly what you want. These sturdy peppers hold their shape and texture so much better under the heat of a pressure canner and are less likely to turn to mush.
Steer clear of any that are soft, wrinkled, or show any dark spots. Those are signs of age or damage, and they won't hold up well in the canning process.
Cleaning and Coring Your Peppers
Once you've got your peppers home, the prep work is pretty straightforward but crucial for getting a good, consistent result.
First, give them a thorough wash under cool, running water to get rid of any lingering dirt. Then it's time to core them. I find the easiest method is to slice off the top and bottom, then cut the pepper in half from top to bottom. From there, you can easily pull out the white pith and shake out any remaining seeds.
Next, you'll need to decide how to cut them. You can leave them in halves, slice them into rings, or chop them into one-inch pieces. This choice really comes down to how you plan on using them later. I often do a mix—some in strips for fajitas down the road, and others diced for tossing into winter soups and stews.
Pro Tip: Uniformity is your friend. Whether you slice or dice, try to keep the pieces roughly the same size. This helps them pack neatly into the jars and cook evenly during processing. It's a small step that makes a noticeable difference in the final quality.
The Critical Pre-Canning Step
Now for what I consider the most important part of the prep work: removing that tough outer skin. This isn't just about getting a better texture; it's also about helping the heat penetrate the pepper flesh more effectively and safely during the canning process.
You have two excellent methods to choose from.
Blistering: Lay your pepper halves skin-side up on a baking sheet and slide them under a hot broiler. Keep a close eye on them until the skins are blackened and blistered, which usually takes about 6-8 minutes.
Boiling: If you prefer, you can drop the peppers into a pot of boiling water for about 3 minutes, or just until you see the skins start to loosen.
Whichever method you choose, the next step is the same. Immediately plunge the hot peppers into a big bowl of ice water. This "shocks" them, stopping the cooking process in its tracks and making the skins incredibly easy to peel right off with your fingers.
This kind of prep is foundational for preserving all sorts of vegetables, and you can find more universal tips in our guide on canning vegetables for beginners. Once they're peeled, your peppers are officially ready for the jars.
A Practical Guide to Pressure Canning Peppers
Alright, your peppers are prepped and your jars are hot. It's time for the main event. This is where we move from prep work to actual preservation, bringing everything together to create something you can be proud of.
The process is methodical, but don't let that intimidate you. It’s more like following a trusted recipe than conducting a high-stakes science experiment. Each step builds on the last, from getting the peppers neatly into the jars to confidently managing your pressure canner.
Packing Jars with Precision
With your clean, hot jars ready to go, start by loosely packing the pepper pieces into each one. The key here is loose—don't cram them in. You need to leave enough room for the hot liquid to circulate around every single piece. For pint jars, aim to leave about one inch of headspace, which is that critical empty space between the top of the peppers and the rim.
Next, it's time for the liquid. This can be simple boiling water or a seasoned brine, whatever your recipe calls for. Carefully ladle the hot liquid over the peppers, making sure it fills in all the little gaps between the pieces.
This visual breaks down the key steps for filling and sealing your jars perfectly.

As you can see, hitting that one-inch headspace mark after adding the liquid is absolutely essential for getting a proper vacuum seal later on.
Once the liquid is in, grab a headspace tool or a non-metallic spatula and run it down the inside of the jar. This helps release any trapped air bubbles. Give that headspace one last check and top it off with more liquid if needed to get back to that one-inch mark.
Now for a crucial step: wipe the rim of each jar with a clean, damp cloth. Any little speck of food or grease left on the rim can prevent a good seal. Center a fresh lid on top, then screw on the band until it’s just fingertip-tight. This means you tighten it until you feel resistance, and then you stop. If you crank it down too hard, air can't escape during processing, and your jars won't seal.
Managing the Pressure Canner
Gently place your filled jars onto the rack inside your pressure canner. It should already have a couple of inches of simmering water in it—check your canner's manual, but it's usually 2-3 inches. Lock the lid in place and turn the heat up to high.
Now, watch the vent pipe. You're looking for a steady, strong plume of steam. This step is called venting, and it's non-negotiable. You need to let that steam vent for a full 10 minutes to push all the air out of the canner. Once the 10 minutes are up, place the weight on the vent pipe.
The pressure will start to climb. Keep a close eye on your dial or weighted gauge. For green peppers, you’ll process at 10 pounds of pressure (psi), but this is one of those times where you must adjust for your altitude.
0-1,000 feet: 10 psi
Above 1,001 feet: 15 psi
As soon as your canner hits the target pressure, start your timer. For both pints and half-pints, green peppers need 35 minutes of processing time. Your job now is to keep that pressure steady. It cannot dip below the target for the entire 35 minutes, so you may need to adjust your stove's heat up or down slightly.
The process for pressure canning peppers feels very familiar once you've done other low-acid vegetables. Once you get the hang of this, you’ll feel confident enough to tackle just about any produce from the garden. The core principles of venting, monitoring pressure, and adjusting for altitude are the same.
If you enjoy this process, you might also like our guide on pressure canning green beans, which follows a very similar workflow.
When the timer finally goes off, turn off the heat and just let the canner be. Don't try to rush the cool-down. Once the pressure gauge reads zero, you can safely open the lid and move on to the final stage.
What to Do After the Canning Is Done

The timer just went off. You've successfully processed your peppers, but don't rush to pull them out. The most critical moments for getting a good, safe seal happen right now.
Your pressure canner is still a hot, pressurized environment. The single most important thing you can do at this point is turn off the heat, walk away, and let it be. Just let it cool down on its own.
This natural depressurization period is non-negotiable. It allows the temperature and pressure inside your jars to stabilize slowly along with the canner's internal environment. If you try to speed things up, you risk siphoning (liquid loss from your jars) or, even worse, broken glass.
Once the pressure gauge hits zero and the lid lock drops, give it another 10 minutes. Only then should you carefully remove the lid, making sure to tilt it away from your face to avoid a blast of hot steam.
The Cooling and Sealing Process
Using a jar lifter, move the hot jars over to a towel-lined countertop. This little detail is huge—placing a screaming-hot jar directly on a cold surface like granite or quartz can cause thermal shock, cracking the glass instantly.
Now for the best part: listening. Over the next few hours, you'll start to hear that satisfying ping! as each lid seals. Leave the jars completely undisturbed for a full 12 to 24 hours. Whatever you do, don't press on the lids or fiddle with the bands.
This waiting period is where the magic happens. As the contents of the jar cool and contract, a vacuum forms, pulling the lid down tight. Messing with the jars during this time is the number one cause of seal failure. A little patience here makes all your hard work worth it.
After 24 hours have passed, it's time for inspection. Press down on the center of each lid. If it’s firm and doesn’t flex or pop back, you’ve got a perfect seal. If any lid clicks or moves, that jar didn't seal properly.
Handling Unsealed Jars and Final Storage
Don’t panic if a jar or two doesn't seal. It happens to everyone! That jar isn't a failure; it’s just not shelf-stable. Pop it in the refrigerator and plan to use those peppers within the next week. It's not considered safe to re-process the jar.
If you're new to preserving, it's helpful to understand why some foods need a pressure canner while others don't. You can learn more about the science behind it in our article explaining how to can without a pressure canner for high-acid foods.
For your successfully sealed jars, the final steps are simple but important for long-term storage.
Remove the Bands: Gently unscrew and take off the metal bands. Storing jars without them prevents rust and lets you spot a bad seal immediately.
Clean the Jars: Give the jars a quick wash with warm, soapy water to get rid of any sticky residue from the canning process. A clean jar won't attract pests to your pantry.
Label and Date: Clearly label each jar with "Green Peppers" and the month and year it was canned. Trust me, you'll thank yourself later.
Store your beautifully preserved peppers in a cool, dark, and dry spot like a pantry or cupboard. When stored correctly, they'll maintain their best quality for at least a year.
So, What Do I Do With All These Peppers?
Once your jars are sealed, cooled, and lined up on the pantry shelf, the real fun begins. Having a stash of home-canned green peppers is like having a secret weapon for weeknight dinners and last-minute meals. These aren't just for topping a salad; they're your head start on countless dishes.
Think beyond the obvious. Dice a handful and fold them into a hearty omelet or frittata for a burst of summer flavor, even in the middle of winter. You can stir them straight into a slow-cooker chili or beef stew, where their soft, tender texture will meld right into the sauce. They add an instant layer of complexity without any extra prep work.
Your New Weeknight Dinner Shortcut
My absolute favorite way to use them is for those nights when I'm short on time. Sauté them with some onions, and you’re minutes away from fajitas or some killer sausage and pepper sandwiches.
You can also drain them well, pat them dry, and scatter them over a homemade pizza before it goes into the oven. They add a delicious, slightly tangy bite that cuts through the richness of the cheese and tomato sauce beautifully.
These preserved peppers are more than just an ingredient; they're a shortcut to a real, home-cooked meal. Having them ready to go means you can pull together a complex-tasting dish on a busy Tuesday night with barely any effort.
It's this convenience that has home canners and commercial producers alike seeing a huge demand. In 2022 alone, the global pepper industry produced around 602,000 metric tons, with online sales of pepper products jumping 25% year-over-year. If you're curious, you can discover more insights about these market trends and see just how popular these pantry staples have become.
Common Questions About Canning Green Peppers
As you get the hang of canning green peppers, a few questions almost always pop up. Let's walk through some of the most common ones I hear, so you can feel completely confident in your new skill.
One of the first things people ask about is the texture. Yes, your home-canned peppers are going to be soft, and that's perfectly normal.
The high heat of the pressure canner cooks them thoroughly. This step is non-negotiable for safety, but it does change their texture from crisp to tender. They’re absolutely perfect for tossing into cooked dishes like soups, fajitas, and casseroles where you want that flavor infused right in.
Safety and Storage FAQs
Another frequent—and really important—question is about the canning method itself. Can you just use a water bath canner instead of a pressure canner for green peppers?
The answer is a firm no. Green peppers are a low-acid food, and a boiling water bath canner simply cannot reach the 240°F (116°C) temperature needed to destroy botulism spores. For unpickled peppers, pressure canning is the only scientifically validated safe method for home preservation. Trying to shortcut this is a serious safety risk.
Think of it this way: a water bath is for high-acid foods like fruits and pickles. A pressure canner is the required tool for low-acid vegetables, meats, and poultry. Using the right tool for the job is what makes home canning a safe and rewarding practice.
So, how long will your beautifully preserved peppers last? When you process them correctly and store the jars in a cool, dark place like a pantry, they'll remain safe to eat for at least one year.
For the best flavor and quality, I try to use mine within 12-18 months. And as with any home-canned good, always check that the seal is still tight before you open a jar.


Facebook
Instagram
X
Youtube