
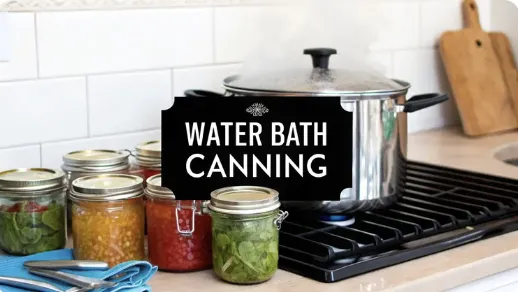
How to Can Without a Pressure Canner: Water Bath Method Tips
How to Can Without a Pressure Canner: Water Bath Method Tips
It's absolutely possible to can food safely without a pressure canner, but let's get one thing straight right away. This method is only safe for high-acid foods.
This isn't some new-fangled trick; it’s a proven, time-tested technique called water bath canning. It works because the boiling water is hot enough to preserve foods with a pH of 4.6 or lower—an environment where the dangerous bacteria that cause botulism simply can't survive.
What You Can Safely Can Without a Pressure Canner

The real secret to knowing how to can without a pressure canner isn't about fancy equipment; it’s about understanding food acidity. High-acid foods create an environment that naturally stops the growth of Clostridium botulinum spores, the nasty bacteria behind botulism. The heat from a simple boiling water bath is more than enough to kill off the mold, yeast, and other common spoilage culprits in this acidic setting.
On the other hand, low-acid foods like fresh vegetables, meats, and most soups are a different story. They demand the much higher temperatures that only a pressure canner can reach to be made safe for your pantry shelf.
Simply put, when you're water bath canning, acidity is your best friend. This method has deep roots; home canners relied on it long before modern pressure canners were common, with the USDA first formally recommending it for high-acid foods back in 1909.
The pH Litmus Test
So, how do you know what’s safe to can this way? It all boils down to the food’s pH level. The magic number, the line in the sand, is a pH of 4.6.
High-Acid Foods (pH 4.6 or lower): These are your ideal candidates for a water bath. Think fruits, jams, jellies, and properly acidified recipes like pickles and salsas. Their natural acidity—or added acidity—does the heavy lifting for safety.
Low-Acid Foods (pH above 4.6): This group lacks the acid needed to stop dangerous bacteria. It includes most fresh vegetables, all meats and poultry, fish, and dairy. For these, a pressure canner is absolutely non-negotiable. Our guide on canning vegetables for beginners digs deeper into why this distinction is so critical.
A common mistake I see beginners make is assuming all vegetables are fine for a water bath. While tomatoes are acidic enough (sometimes with a little help), things like green beans, corn, and carrots are low-acid. They must be pressure canned unless they are properly pickled in a high-acid brine that lowers their overall pH.
To make things crystal clear, here’s a quick guide to help you confidently sort your foods.
Safe vs Unsafe Foods for Water Bath Canning
This table is a great starting point for understanding which foods belong in a water bath canner and which ones need the high heat of a pressure canner. When in doubt, always stick to a tested recipe from a trusted source.

Remember, this isn't about being overly cautious—it's about being smart and safe. Sticking to high-acid foods for your water bath canning ensures that your pantry is filled with delicious preserves that are, most importantly, safe to eat and share.
Gathering Your Water Bath Canning Gear

Let's get your toolkit together. Learning how to can without a pressure canner is way more about technique than it is about buying expensive, single-purpose equipment. In fact, you probably have the most important piece in your kitchen right now: a big, deep pot.
You don’t need an official “canner.” Any large stockpot will do the job, as long as it’s deep enough. The goal is to hold your jars on a rack and still have at least one to two inches of roiling, boiling water covering them completely. It’s that constant, immersive heat that makes the magic—and the science—happen.
The Essential Canning Kit
Beyond the pot, a few core items are absolutely non-negotiable for safety and getting a good result. Think of these as the foundation of any water bath canning project.
Glass Canning Jars: Stick with jars made specifically for canning, like the ones from Ball or Kerr. They’re built to handle the temperature swings and create a seal you can trust.
New Lids: This is a huge safety point. The sealing compound on a lid is designed for a single use. Trying to reuse them dramatically increases the risk of a bad seal, which means spoiled, unsafe food. It’s just not worth it.
Bands (or Rings): These you can reuse, provided they aren’t bent or rusted. Their only job is to hold the lid in place while the jars are processing. You can even take them off once the jars have sealed and cooled completely.
Here’s a simple trick I learned early on: put a folded dish towel or a round metal cooling rack in the bottom of your pot. This keeps the jars from rattling directly on the metal base, which can cause cracks or outright breakage from the intense vibration of boiling water.
Quality of Life Tools for Smoother Canning
While you can get by with the basics, a few inexpensive tools make the process so much easier and, frankly, a lot safer. I learned the hard way that wrestling hot, slick jars out of boiling water with a pair of kitchen tongs is a recipe for disaster.
I would 100% recommend you buy a jar lifter and a canning funnel. I’d be lying if I didn’t admit to breaking more than one jar full of hot pickles before breaking down and buying the proper utensils. A jar lifter gives you a secure grip, and a funnel keeps your jar rims perfectly clean for a better seal.
These accessories aren't just about convenience; they're about control. A clean workspace and secure handling of hot jars cut down on the stress and prevent the common little mistakes that can ruin a whole batch.
Here are the few I really think are worth it:
Jar Lifter: A purpose-built tool with rubberized grips that clamps securely around hot jars. It makes moving them in and out of the boiling water effortless and safe.
Canning Funnel: This wide-mouthed funnel sits perfectly inside the jar opening, stopping spills and keeping the rim clean—which is a critical step for getting a perfect, airtight seal.
Bubble Popper/Headspace Tool: Just a simple plastic stick, but it’s a game-changer. You slide it down the inside of the jar to release trapped air bubbles and use the notches on the end to perfectly measure the headspace (the gap between the food and the lid).
A Practical Walkthrough of Water Bath Canning
With your gear all set, it’s time to get our hands wet. I find it’s always easiest to learn by doing, so let's walk through the whole process together. This isn't just a list of steps; think of it as me in the kitchen with you, guiding you from a clean, empty jar to a shelf-stable treasure.
We’ll use a classic for our example: a small batch of strawberry jam.
First things first, let's get your station ready. Go ahead and place your canning rack or a folded kitchen towel in the bottom of your big stockpot. Set your empty jars on the rack, then fill the pot with enough water to cover them completely. Bring this to a simmer—this sterilizes the jars and gets your water bath prepped for the main event.
While that’s heating up, take your new lids and put them in a small saucepan of hot water. You don't want it boiling, just hot enough to soften that red sealing compound around the edge.
Filling and Sealing Your Jars
This is where the little details really make or break your batch. Carefully lift a hot, sterilized jar out of the pot and set it on a towel or wooden cutting board. Using your canning funnel, ladle the strawberry jam into the jar, but be sure to leave the right amount of headspace.
What’s headspace? It’s simply the empty space between the top of the jam and the rim of the jar. For jams and jellies, ¼-inch of headspace is the gold standard. This gap is non-negotiable; it's what allows the food to expand during processing and creates the vacuum you need for a good, strong seal. Get this wrong, and you'll likely have jars that don't seal.
Once the jar is filled, you need to get any trapped air out. I use a bubble-popper tool, but a clean chopstick works just as well. Just slide it down the inside of the jar in a few spots. You’ll be surprised at the little pockets of air that were hiding in there!
Next, grab a clean, damp cloth and carefully wipe the rim and threads of the jar. You need to be meticulous here. Even a tiny smear of sticky jam can keep the lid from sealing properly. Center a warm lid on that clean rim, then screw on the band until it’s just fingertip tight. All this means is you turn it until you feel resistance, and then stop. Don't crank it down—that can actually prevent a good seal.
Patience is a virtue in canning. The most critical moments are often the quietest ones—wiping a rim clean, measuring headspace precisely, and resisting the urge to crank down the band with all your strength. These small details make all the difference between success and a frustrating batch of unsealed jars.
This simple workflow shows the core stages you'll follow every time.

As you can see, successful canning really just comes down to following these fundamental steps in the right order.
Processing and Cooling
Alright, it's time for the main event. With your jar lifter, carefully lower your filled jars into the simmering water. The water level needs to be at least one to two inches above the tops of the jars. If you're a little short, just add more hot water from your kettle. Pop the lid on the pot and turn the heat to high.
Here’s a crucial tip: only start your timer when the water returns to a full, rolling boil. Not a simmer, a real boil. For our strawberry jam in half-pint jars at sea level, that’s a 10-minute processing time. This is the part of the process that forces air out of the jars and kills off any microorganisms that could cause spoilage.
When your timer goes off, turn off the heat and take the lid off the pot. Let the jars sit right there in the hot water for another five minutes. This little rest period helps prevent thermal shock, which can cause liquid to siphon out of the jars. If you want to dive deeper into these foundational techniques, we have a complete guide on the basics of preserving food at home.
Finally, use your jar lifter to pull the jars out, keeping them nice and level. Place them on a towel-lined countertop, leaving a few inches of space between them for good air circulation.
And now, we wait. For the next 12 to 24 hours, just leave them be. Don't touch them, don't tilt them, and definitely don't tighten the bands. Over the next few hours, you should start to hear that wonderful, satisfying "ping!" as each jar seals itself shut. It’s the best sound in canning.
Mastering Processing Times and Altitude Adjustments
When a canning recipe tells you to process your jars for 10 minutes, that’s not a friendly suggestion—it’s a non-negotiable rule. That specific window of time is what makes your food safe to eat months down the road. It’s the period where you’re actively destroying the microorganisms that cause spoilage.
One of the most common mistakes I see new canners make is starting the timer too early. Your countdown only begins after the water returns to a full, rolling boil once the jars are in the pot. A gentle simmer just won't cut it. It simply isn't hot enough to get the job done right.
The Altitude Effect on Canning
Here’s a bit of kitchen science that every single home canner needs to burn into their memory: water boils at different temperatures depending on your elevation.
At sea level, water boils at a clean 212°F (100°C). But as you go up, the air thins out, and the boiling point drops. For every 1,000 feet you climb, the boiling point of water decreases by about 2°F.
This might not sound like a big deal, but it has a massive impact on food safety. A lower boiling point means less heat is penetrating your jars. To make up for that drop in temperature, you must increase the processing time. Failing to adjust for your altitude is one of the most dangerous shortcuts you can take.
Think of it like this: You're aiming for a total amount of "heat work" to be done inside that jar. If the temperature is lower because you live up in the mountains, you have to increase the time to get the same amount of work done. It’s like trying to bake a cake at 300°F instead of 350°F—if you don’t bake it longer, it’s going to be raw in the middle.
Understanding this simple adjustment is what separates a novice canner from a confident, safe preserver. It empowers you to take any trusted recipe and make it work safely in your own kitchen.
Altitude Adjustment Chart for Water Bath Canning
Following tested recipes and timing them accurately are the golden rules of safe canning. The chart below makes it incredibly simple to adjust any water bath canning recipe for your specific location.
Just figure out your home's elevation, find where it falls in the chart, and add the extra minutes to the processing time called for in your recipe.

For instance, if you're making a batch of strawberry jam that calls for a 10-minute processing time and you live at 4,500 feet, you would need to process your jars for a total of 20 minutes (the recipe’s 10 minutes + 10 minutes for your altitude).
This simple math ensures every beautiful jar you line up on your pantry shelf is as safe as it is delicious.
How to Check Seals and Store Your Canned Goods

Once your jars are resting on the counter, the hard work is done, but the canning process isn't quite over. This is where patience comes in, as you wait for that magical, satisfying "ping!" It’s the sound of a vacuum forming as the contents cool, pulling the lid down tight to create an airtight seal.
You’ll hear these pings over the next few hours. It’s one of the most rewarding moments of the entire process, a little signal that you're on your way to a successful batch. After letting the jars sit completely undisturbed for 12 to 24 hours, it's time for the final quality check.
The Foolproof Press Test
The most reliable way to check for a good seal is also the simplest. Just press down on the center of the lid with your finger.
Here’s what you’re looking for:
A Good Seal: The lid is firm and doesn’t move. It won't flex, pop, or make any clicking noise. This means a strong vacuum has formed, and the jar is shelf-stable.
A Bad Seal: If you press the center and it moves up and down with a popping or clicking sound, the jar did not seal properly. This food is not safe for long-term pantry storage.
Another great way to confirm the seal is to remove the screw band and gently try to lift the jar by its lid. A properly sealed lid will easily hold the full weight of the jar.
Never assume a jar is sealed just because you heard a ping or the lid looks flat. Always perform the manual press test after the 12-24 hour cooling period. This simple check is your last line of defense against spoilage and ensures the food you worked so hard on is safe to eat.
Handling Unsealed Jars
Finding a jar that didn't seal isn't a failure; it just means you need to deal with it right away. Don't panic! You have two simple, safe options.
Your first choice is to reprocess it immediately. Check the jar rim for any nicks or food residue that might have caused the problem. If the rim is clear, just grab a new lid and run the jar through the entire water bath process again, using the original processing time.
The second—and often easier—option is to refrigerate the jar and use it first. Treat it like any other fresh food. That jar of strawberry jam that didn't seal? It just became the perfect topping for your toast over the next few days.
Storing Your Preserves
Once you've confirmed your seals are solid, wipe down the jars, label them with the contents and date, and—this is important—remove the screw bands. Storing jars with the bands on can trap moisture, lead to rust, and even hide a failed seal later on.
The ideal storage spot is a cool, dark, and dry place like a pantry, cellar, or a quiet cupboard. Light and heat are the enemies of canned goods; they break down the food's quality, color, and flavor over time. Properly stored, your high-acid, water-bath-canned foods will stay delicious and safe for at least a year.
Still Have Questions? Let’s Clear Things Up
Even after you’ve got a few jars cooling on the counter, it’s completely normal to have lingering questions. Canning isn’t just about following steps; it’s about understanding why those steps matter. Over the years, I’ve heard the same worries and curiosities from new canners, so let's tackle some of the most common ones head-on.
Can I Reuse Canning Lids to Save a Few Bucks?
I get it, we all want to be frugal. But when it comes to canning lids, the answer is a firm no. You should never, ever reuse the flat lids.
That little ring of pliable sealing compound on the underside of a new lid is designed for one-time use. It creates a perfect, airtight seal when heated and cooled. Trying to use it a second time is a huge gamble—you're risking a failed seal. That failure might happen right away, or worse, it could happen weeks later on your pantry shelf, allowing dangerous bacteria to grow.
Always start with brand-new lids for every single jar. It’s the cheapest insurance you can buy for safe, delicious food. The screw bands (the rings), on the other hand, can be used over and over as long as they aren't bent or rusty.
Why Can’t I Use This Method for Green Beans or Corn?
This is probably the most critical safety rule in canning, so it’s worth understanding. Green beans, corn, meats, and most other plain vegetables are low-acid foods. Their natural pH just isn't acidic enough to prevent the growth of Clostridium botulinum spores, the culprit behind botulism.
A boiling water bath maxes out at 212°F (100°C). While that’s plenty hot for killing off molds and yeasts in high-acid foods, it’s not hot enough to destroy botulism spores.
To safely can low-acid foods, you must use a pressure canner. It’s the only method that can reach temperatures of 240°F (116°C) or higher, which is the required temperature to make those foods shelf-stable and safe. This rule is non-negotiable, whether you're working with produce from the farmer's market or learning to grow your own food at home.
Is Oven Canning a Safe Alternative?
You might see "oven canning" mentioned in old cookbooks or on vintage blogs, but please, steer clear. Oven canning is not a safe or approved method of food preservation, and food safety experts universally advise against it.
There are a couple of big reasons why. First, dry oven heat is a terrible conductor compared to boiling water or steam. The food in the center of the jar almost never gets hot enough to kill all the harmful microorganisms, creating a serious safety hazard.
Secondly, and more immediately, jars can and do explode in the oven. The pressure that builds up inside a sealed jar exposed to dry, uneven heat is unpredictable and incredibly dangerous. Stick with the proven methods—water bath canning for high-acid foods and pressure canning for low-acid foods. Your safety and your food are worth it.
At The Grounded Homestead, we're dedicated to helping you gain the skills and confidence to embrace a more self-sufficient lifestyle, from your garden to your pantry. https://thegroundedhomestead.com


Facebook
Instagram
X
Youtube