
How to Preserve Eggs Without Refrigeration
How to Preserve Eggs Without Refrigeration
Knowing how to preserve eggs without a fridge is a timeless skill, and it all boils down to one thing: protecting the egg's natural armor.
Whether you're water glassing, coating them in oil, or just finding the coolest corner of your pantry, every method works by sealing the shell's pores. This locks out bacteria and keeps moisture in, letting you safely store fresh, unwashed eggs for months. It’s an old-school trick that extends your food supply far beyond the limits of a modern refrigerator.
Why You Should Learn to Store Eggs Without a Fridge
Before refrigerators became a household staple, families had clever, time-tested ways to keep food from spoiling. Learning how to preserve eggs is more than just a history lesson; it's a practical skill for anyone looking to be a little more self-sufficient.
This knowledge is a game-changer if you raise backyard chickens and find yourself buried in eggs during the spring flush. Instead of scrambling to use them all, you can build a stable pantry supply. It's also a cornerstone of emergency preparedness, ensuring you have a reliable protein source when the power goes out.
For a deeper dive into building that kind of resilience, our guide on long-term food storage strategies is a great next step.
Understanding the Egg's Natural Defense
The real secret to storing eggs outside the fridge lies in the bloom, or cuticle. This is a nearly invisible, waxy layer a hen puts on the eggshell right before laying. Think of it as nature’s perfect, built-in Tupperware.
The bloom does two critical jobs:
It seals thousands of microscopic pores on the shell, blocking bacteria like salmonella from getting inside.
It slows down moisture loss, keeping the egg's contents from drying out too quickly.
When eggs are washed commercially, this protective layer gets stripped right off. That's why store-bought eggs in the U.S. must be refrigerated.
The key takeaway is simple: if you want to store eggs without a fridge, you must start with fresh, unwashed eggs to keep that bloom intact. Every preservation method we'll talk about is designed to either protect this natural coating or create an artificial one that does the same job.
Water Glassing: The Old-World Secret to Year-Round Eggs
Of all the old-school ways to keep eggs fresh without a refrigerator, water glassing is my absolute favorite. It's a fascinating and incredibly reliable technique that involves nothing more than submerging fresh, unwashed eggs in a solution of slaked lime (calcium hydroxide) and water.
This simple mix creates an alkaline bath that seals the eggshell's pores, effectively putting the egg into a state of suspended animation. This isn't some new-fangled homesteading trend; it's a method that has proven itself for centuries. Before refrigeration was a thing, families relied on water glassing to store the bounty of spring and summer eggs to get them through the lean winter months.
The process is straightforward, the supplies are minimal, and it can keep eggs perfectly fresh for well over a year.
Gathering Your Supplies
Getting started with water glassing couldn't be simpler. You only need a few key items, and the quality of these materials will directly impact your success.
Food-Grade Hydrated Lime: This is the non-negotiable ingredient. Make sure you buy food-grade slaked lime, sometimes sold as pickling lime or calcium hydroxide. Do not use agricultural or garden lime, as they contain impurities you don't want near your food.
Clean, Unwashed Eggs: This is critical. You can only use eggs with their natural bloom intact. They should be as clean as possible, with no mud or manure caked on. Never, ever use washed eggs, because removing that bloom leaves the shell's pores wide open and vulnerable.
A Large, Food-Safe Container: A five-gallon food-grade bucket with a lid is perfect if you have a lot of eggs to store. For smaller batches, large glass jars or ceramic crocks work just as well.
Filtered or Distilled Water: Tap water can sometimes contain chlorine or other minerals that might interfere with the process, so it's always best to play it safe and use chlorine-free water.
Preparing the Water Glassing Solution
The magic is all in the ratio. For every one quart of water, you’ll need one ounce (by weight) of hydrated lime. I highly recommend using a kitchen scale for this—measuring by volume just isn't accurate enough.
First, add your measured lime to the container. Then, slowly pour in the water while whisking constantly to break up any clumps. You're aiming for a smooth, milky-looking liquid. Once it's mixed, let the solution sit for a few hours. This allows any undissolved lime to settle out at the bottom.
Now you're ready to add the eggs. Carefully place each egg into the container, making sure the pointed end is facing down. Be gentle as you layer them in to avoid cracking any shells.
As you add more eggs, the liquid level will naturally rise. Keep going until your container is nearly full, but make absolutely sure you leave at least two inches of the lime solution covering the very top layer of eggs.
This historical technique is incredibly effective. Back in the 18th century, submerging eggs in a slaked lime solution was a primary preservation method, keeping them fresh for up to eight months. Modern homesteaders have found the same thing, reporting a success rate of nearly 100% when the steps are followed correctly. You can dive deeper into the history of these preservation techniques to see just how effective they were.
Seal the container with a good, airtight lid and tuck it away in the coolest, darkest place you have. A basement, root cellar, or even a cool pantry is ideal. You’re looking for a stable temperature somewhere between 50-60°F (10-15°C). Stored this way, your eggs will remain fresh and edible for a remarkably long time, giving you a reliable source of protein all year long.
Using Oil Coating for Simpler Storage
If water glassing feels a bit too intensive, there’s a much simpler, time-tested method that works wonders: coating your eggs in oil. It’s perfect for extending the life of fresh eggs for several months, though not for years like water glassing.
The science here is wonderfully simple. A thin layer of oil seals the thousands of microscopic pores on the eggshell. In doing so, it essentially mimics the egg’s natural bloom, which gets washed off when you clean them.

This invisible barrier stops air and bacteria from getting in while slowing down moisture loss. It’s a fantastic way to manage a steady supply from your backyard chickens, letting you build a rotating stock that lasts far longer than untreated eggs. The whole process is quick, requires almost no special supplies, and you can easily do it in small batches as you gather eggs each day.
Choosing and Applying the Right Oil
The type of oil you choose actually matters quite a bit. Your best option is food-grade mineral oil. Why? Because it’s completely odorless, tasteless, and it won’t go rancid over time. If you don’t have any on hand, other stable fats will work in a pinch. Historically, folks used whatever they had, including lard or even butter.
This practice has been around for centuries. Back in the 18th century, a French scientist named René-Antoine Ferchault de Réaumur was experimenting with all sorts of coatings and found that some could keep eggs fresh for years. While his favorite varnish wasn’t exactly common, greasing eggs with fat became a practical, widespread alternative. You can read more about these fascinating historical egg preservation methods and see just how resourceful people have always been.
Here’s how to do it right:
Start with Clean Eggs. Make sure you’re working with clean, fresh, and unwashed eggs. Your hands should be clean and dry, too—you don't want to introduce any contaminants.
Apply a Thin Coat. Pour just a little oil onto your hands or a clean cloth. Gently rub it over the entire surface of each egg. You’re aiming for complete but very light coverage—a faint sheen, not a greasy mess.
Store Them Properly. Place the coated eggs back into a clean carton with the pointed end down. This keeps the air sac at the blunt end stable, which helps keep the yolk centered and extends freshness.
Store your oiled eggs in a cool, dark spot like a pantry or cellar. They don’t need refrigeration, but a stable, cool temperature is key. It's a good idea to turn the cartons every few weeks to prevent the yolks from settling to one side.
What to Expect from Oiled Eggs
Under ideal conditions, eggs preserved this way can stay fresh for up to nine months. Realistically, though, you can count on a solid three to six months of excellent quality. They’re perfect for everything from frying and scrambling to baking.
This method isn’t about extreme long-term survival storage. It’s about practical, medium-term preservation. It’s the perfect solution for anyone who wants to build up a good pantry stock without the space or commitment that water glassing requires.
Comparing Egg Preservation Methods
Deciding on the right way to preserve your eggs really comes down to what you’re trying to accomplish. What works for a homesteader putting up a thousand eggs for winter might be overkill if you're just trying to get a few dozen to last a bit longer. Your goals, your timeline, and the resources you have on hand will point you toward the best fit.
Let's break down the most common non-refrigerated techniques—water glassing, oil coating, and basic cool storage. We'll look at how long you can expect your eggs to last, what kind of work is involved, and what you’ll need to get started.
Evaluating Your Options
When it comes to serious, long-term storage, water glassing is the undisputed champion. This method can keep eggs fresh for a year, sometimes even longer. It does require a few specific supplies, like food-grade lime and a large, non-reactive container, but the setup is a one-and-done job. Once the eggs are submerged, they're pretty much set with minimal fuss.
If you’re looking for a solid middle ground, oil coating is your best bet. It’s less involved than water glassing but still extends freshness for an impressive three to nine months. The main task is simply applying a thin coat of mineral oil to each egg. It's straightforward but needs to be done for every single egg you want to preserve.
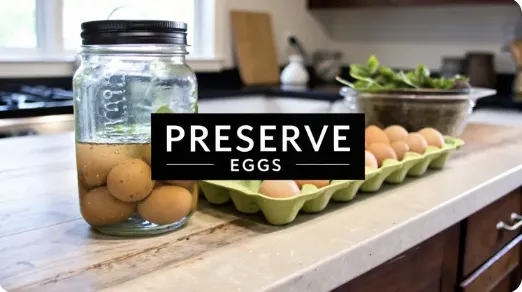
This is a great visual of what water glassing looks like in practice—just clean eggs submerged in a simple lime-water solution.

As you can see, the process is simple. The lime solution effectively seals the eggshells, locking in freshness for the long haul.
A Head-to-Head Breakdown
To make the choice even clearer, let's put these methods side-by-side. Each one shines in different situations, and understanding the trade-offs is key. This is the same kind of thinking you'd apply to other food preservation projects. For more on that, you can see our guide on how to preserve meat without refrigeration for more ideas on building a resilient pantry.
Effectiveness of Egg Preservation Techniques
Here’s a side-by-side look at how these different non-refrigerated methods stack up, focusing on shelf life, how much work is involved, and what they’re best used for.

While these traditional methods are incredibly effective, it’s interesting to see how they compare to modern refrigeration. Research confirms that while a fridge is great for keeping eggs at peak quality for a few weeks, these older techniques offer a huge advantage when cold storage isn't an option. One 2014 study found that refrigerated eggs maintained 100% internal quality for up to three weeks, while oiling provided a slightly shorter but still valuable window. You can dig into the full findings on different preservation methods if you want to see the raw data.
Ultimately, choosing the right method comes down to how long you need your eggs to last and how much work you want to put in upfront. For true long-term food security, nothing beats water glassing. For a simpler, medium-term solution that’s accessible to anyone, oil coating is a fantastic and reliable choice.
How to Safely Test Your Preserved Eggs
Proper preservation is only half the battle. Knowing for certain that an egg is safe to eat after weeks or months in storage is just as critical. Before a single preserved egg touches your pan, you have to run it through a few simple safety checks. Think of these steps as your final line of defense—they're non-negotiable for turning your hard work into a safe, reliable food source.

The first and most classic method is the float test. It’s a quick, simple way to get a read on an egg's age and internal condition. Just fill a bowl with cool water and gently lower the egg in.
Over time, an egg’s porous shell loses moisture and takes in air, causing the internal air sac to grow. The float test is a brilliant little piece of homestead science that reveals exactly how much air has gotten inside.
Interpreting the Float Test
The results of your float test tell you pretty much everything you need to know about the egg's condition. You’re looking for one of three outcomes:
Sinks and Lays Flat: This is a very fresh egg. The air sac is tiny, making the egg dense. It’s perfect for frying or poaching.
Sinks but Stands on End: The egg is likely a few weeks old but still perfectly safe to eat. Its air sac has grown just enough to make one end buoyant. These are actually ideal for hard-boiling because they’re far easier to peel.
Floats to the Surface: Discard this egg immediately. A floater means the air sac is very large, and bacteria may have multiplied, creating gases inside the shell. It is no longer safe to eat, period.
Always live by the homesteader's golden rule: when in doubt, throw it out. No egg is worth the risk of foodborne illness. This simple test is your most reliable first filter.
The Essential Sensory Check
But even if an egg passes the float test, you're not done yet. The most important test relies on your own senses. You must crack each preserved egg into a separate, small bowl before adding it to other ingredients.
This step is absolutely critical. It isolates the egg, preventing a single bad one from contaminating an entire meal.
Once it's cracked, give it a good look. Any discoloration in the yolk or white—pinks, greens, or blacks—is a dead giveaway for spoilage.
Finally, trust your nose. A spoiled egg has a distinct, foul, sulfurous smell that’s impossible to miss. If it smells off in any way, get rid of it. No second chances. Combining these checks is the only way to guarantee your preserved eggs are a safe and welcome addition to your pantry.
Common Questions About Storing Eggs
Once you start exploring ways to keep eggs without a refrigerator, a few questions are bound to come up. It can feel a little strange to move away from the cold box we've all been taught to rely on, but these old-school methods have stood the test of time for a reason. Let's dig into some of the most common things people ask so you can get started with confidence.
Right off the bat, most people wonder if they can use eggs from the grocery store for this. The answer is a hard no. In the U.S., commercial eggs are scrubbed clean, a process that strips away the natural protective coating called the bloom. That bloom is nature's way of sealing the eggshell's pores, and without it, the egg is wide open to bacteria unless it's kept refrigerated.
For methods like water glassing or oil coating to have a fighting chance, you absolutely need to start with fresh, unwashed eggs. That means they should come straight from your own flock or from a local farmer you trust—someone who can guarantee the bloom is perfectly intact.
What Happens If a Preserved Egg Cracks
Finding a cracked egg in your water glassing crock or among your carefully oiled eggs is a bummer, but you need to deal with it right away. A cracked shell is a major breach in your preservation defenses.
Pull out the cracked egg and any eggs touching it immediately. Give the nearby eggs a good look, and if they have any residue on them, give them a gentle wash and plan to use them in the next day or two. The cracked egg itself has to go in the compost. It's no longer sealed, and leaving it in there is an open invitation for bacteria that could spoil the entire batch.
A good rule of thumb is to handle your eggs like they're made of, well, eggshell. Lower them into your storage container carefully instead of dropping them in. This helps avoid those tiny hairline cracks you might not even see at first.
This same gentle-handling principle is a good habit for all your preservation projects. When you're putting up herbs, for example, bruising the leaves can really knock down their quality. You can learn more about getting your garden harvest ready for the pantry in our guide on how to preserve fresh herbs.
Can You Add More Eggs to Your Container Later
This is a great question, especially if you're water glassing and your hens are laying a few eggs every day. And the good news is, yes, you absolutely can. As your flock gives you fresh, unwashed eggs, you can keep adding them right into your water glassing solution.
Just keep a few things in mind:
Always add new eggs gently. You don’t want to crack the ones already settled at the bottom.
Make sure the solution still covers the top layer of eggs by at least two inches. Top it off if you need to.
Try to keep track of which eggs went in first. A simple system is to fill one container completely before starting a new one. That way, you’re always using up the oldest batch first.
This "first in, first out" approach keeps your supply properly rotated. For oil coating, it’s even easier—just coat your new eggs and store them in cartons marked with the date.
Troubleshooting Common Preservation Issues
Even when you do everything right, you can run into little hiccups. What if your water glassing solution gets cloudy or grows a film on top? A little bit of cloudiness from the lime settling is perfectly normal. But if you see any signs of mold or catch an off-smell, the batch is unfortunately compromised and needs to be tossed. This can happen if a micro-crack went unnoticed or if the container wasn’t sealed up tight.
With oil-coated eggs, a common problem is temperature swings. If your pantry or root cellar gets too warm during the summer, it can definitely shorten the shelf life of your eggs. The sweet spot is a consistent, cool 50-60°F (10-15°C). If you can’t hold that temperature, just plan on using those eggs a bit sooner. Knowing what to watch for will make you that much better at mastering the art of keeping eggs fresh without the fridge.
At The Grounded Homestead, we're passionate about sharing the skills you need to build a more self-sufficient life. Explore more practical guides and homesteading wisdom at https://thegroundedhomestead.com.


Facebook
Instagram
X
Youtube