
The Top 5 Green Bean Problems—and How to Fix Them Naturally
The Top 5 Green Bean Problems—and How to Fix Them Naturally
I’ll never forget the summer I nearly gave up on green beans.
The plants looked perfect. Lush green leaves, sturdy stems, and flowers in full bloom. I was already imagining rows of canning jars packed with crisp pods. But then it all turned south: the leaves started yellowing, pests chewed holes through everything, and the pods turned out tough and stringy.
Sound familiar?
Green beans (Phaseolus vulgaris) are often marketed as an easy vegetable to grow. But when things go wrong, they go wrong fast. Without a little know-how, it’s easy to think you’ve done something wrong.
Let me be clear: you haven’t failed.
Most green bean growing problems, whether it's pest infestations, fungal disease, or yellow leaves on green bean plants, can be fixed naturally. You don’t need chemicals, just a sharp eye and some time-tested tools.
And to make things easier, I’ve created a free printable Green Bean Troubleshooting Card you can hang near your kitchen garden or greenhouse. You’ll find that at the bottom of this post.
Let’s walk through the top 5 problems affecting green beans—and exactly how to fix them using real, natural solutions that work.

Green Bean Pests That Destroy Your Harvest. And How to Stop Them Naturally
When pests hit your green bean plants, they don’t nibble. They devastate. Before you harvest a single pod, they can take over your rows and set your whole growing season back.
Three main culprits show up time and again in home gardens:
Common Green Bean Pests:
Aphids – Tiny soft-bodied insects that suck plant juices and leave behind sticky honeydew, which can lead to sooty mold.
Mexican Bean Beetles – Yellow-orange beetles that resemble ladybugs but shred leaves like paper lace.
Cutworms – Soil-dwelling larvae that sever young seedlings right at the base; usually overnight.
These insects don’t just damage the leaves—they can stunt growth, reduce yields, and spread plant diseases like mosaic virus or halo blight.
If you're battling pests like aphids or beetles, you’ll also want to read The Top 5 Pests That Wreck Green Beans—And What to Do About Them, where I go deeper into identification and organic control strategies.
Natural Pest Control for Green Beans
Use these simple strategies to reclaim your crop:
Row covers early in the season help protect tender seedlings from pests and cold snaps.
Apply neem oil or insecticidal soap to target aphids—reapply after rainfall for continued protection.
Hand-pick Mexican bean beetles in the cool of the morning and drop them into a jar of soapy water.
Dust the soil surface with crushed eggshells or diatomaceous earth to deter cutworms from attacking your seedlings.
For a detailed guide on identifying key pests and leveraging beneficial insects in your home vegetable garden, you can refer to the Oklahoma State University Extension's Home Vegetable Garden Insect Pest Control fact sheet.
Zone Timing Tip
In USDA Zones 7 and up, these pests tend to show up early. Often by late May when temperatures hit the mid-70s. Start monitoring daily once your seedlings emerge.

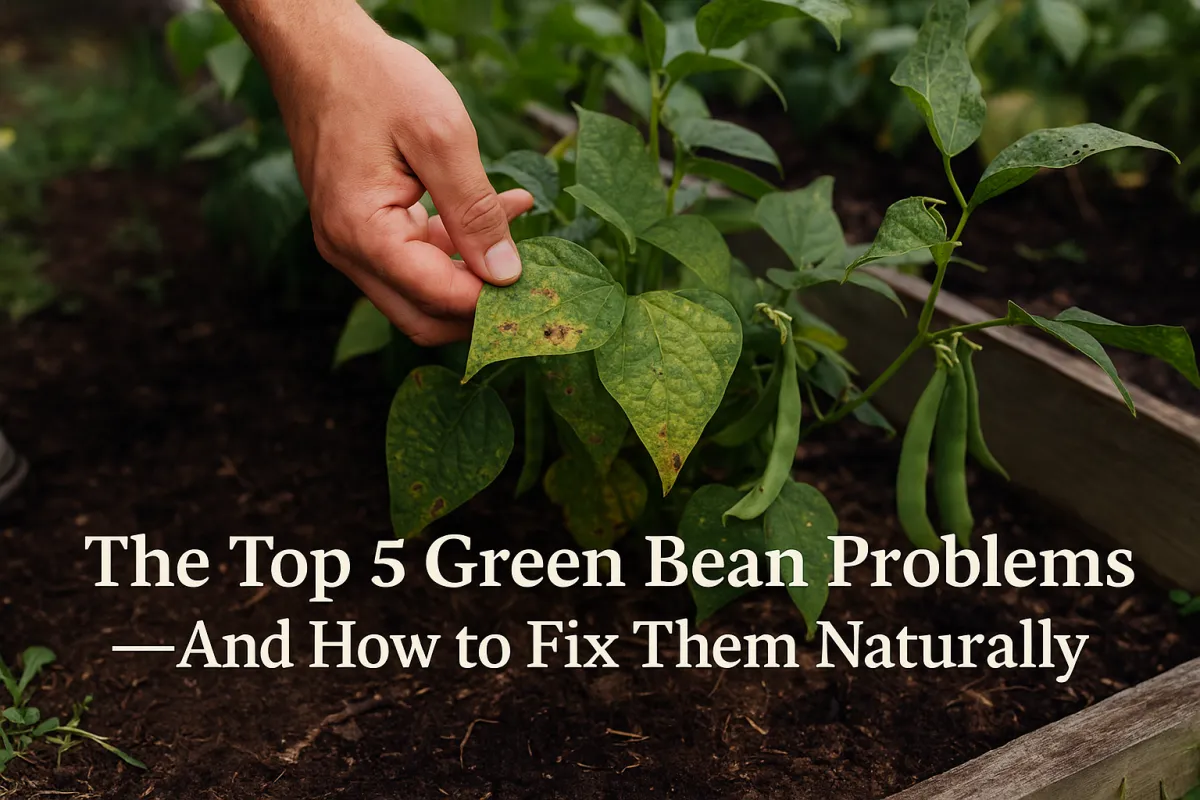
Yellow Leaves on Green Bean Plants? Here’s What It Means
When your green bean leaves turn yellow, it's not just cosmetic. It’s your plant calling for help. Whether it's one leaf or half the row, yellowing usually signals stress beneath the soil.
Common Causes of Yellow Leaves:
Overwatering or poor drainage leading to soggy roots and root rot
Nitrogen deficiency, especially in older leaves at the bottom
Compacted or depleted soil that blocks root development
These issues can delay flowering, reduce yields, or even open the door for bacterial or fungal diseases.
How to Fix Yellowing Leaves Naturally
To get your green bean crop back on track, start at the roots:
Check soil moisture before watering — stick your finger 2" deep or use a soil moisture meter
To take the guesswork out of watering and protect against yellow leaves or root issues, consider a simple soil moisture meter like this.

It helps you keep moisture in the sweet spot without overwatering.
Amend heavy or compacted soil with organic compost or well-aged manure to improve drainage
Feed your beans with a light application of compost tea or diluted fish emulsion every 10–14 days during active growth
Grandma’s take: “If it looks soggy, don’t feed it more water—feed it air and time.”
Soil Health Tip
Green beans thrive in well-draining soil with a pH between 6.0 and 7.0. Run a basic soil test in early spring or midseason if problems pop up. Your plants will tell you what’s missing, but the numbers confirm it.
For help diagnosing whether yellowing leaves are due to nitrogen or other nutrient deficiencies, check out Montana State University Extension’s visual nutrient deficiency guide, which walks you through symptoms step-by-step.

Green Bean Flowers But No Pods? Fix Pollination Issues the Natural Way
Your green bean plants are blooming, but pods are nowhere to be found. Or worse, you're getting stubby, misshapen pods that dry out before they fill.
This isn't bad seed or bad luck. It’s a classic pollination problem. And it’s more common than most gardeners realize.
Why Your Green Beans Aren’t Producing Pods:
Lack of pollinators, especially in suburban or wind-prone gardens
Too much nitrogen, which causes leafy growth at the expense of flowering
Temperature stress — heatwaves or cold snaps disrupt flower and pollen viability
When pollination is poor, your plants can look healthy but fail to produce the yield you're expecting.

How to Improve Pollination Naturally
Here’s how to help your Green Beans (Phaseolus vulgaris) plants set fruit:
Plant companion flowers like borage, dill, or zinnias to attract bees and other beneficial insects
Stop applying high-nitrogen fertilizers once beans begin to flower
Gently hand-pollinate blossoms using a small paintbrush or cotton swab in low-pollinator zones
Avoid overhead watering during midday bloom—wet flowers can reduce pollen transfer
One year I thought my seed was bad. Turns out, I’d overfed the plants and chased the bees away. The next season, I tucked a few basil plants between rows; and I was hauling in pods by the bucket.
Zone Insight
In USDA Zones 5–6, cooler early June mornings (below 65°F) can stall pollinator activity. For best results, time your green bean planting to encourage midsummer flowering when bees are busiest.

Fungal Diseases in Green Beans: What to Watch For After Rainy Weather
When storms roll through your garden, they don’t just water the soil. They create the perfect conditions for fungal diseases to thrive. And if you’re not watching closely, these plant pathogens can take hold before you even know there’s a problem.
Common Fungal Infections in Green Beans:
Rust – Orange or reddish powdery spots on the underside of leaves
Anthracnose – Black or brown streaks on stems and pods, often with sunken lesions
Powdery mildew – White, dusty coating on leaves, especially in humid or shaded areas
These diseases weaken your green bean plants, limit pod development, and can spread rapidly if left untreated; especially in dense, overwatered beds.
Natural Fungal Control Strategies
Use these no-spray solutions to stay ahead of fungal outbreaks:
Water at the base, not overhead, and do it early in the day so leaves dry by nightfall
Apply a mulch layer to prevent soil splash during heavy rain
Spray weekly with a baking soda solution (1 tsp per quart of water) or diluted milk spray (1:10 ratio) as a preventative
Remove and destroy infected leaves or pods—never compost diseased tissue
For a research-based breakdown of common bacterial blights affecting green beans and effective cultural management tactics, see the UC IPM guidelines on Common Bacterial Blight in dry beans.
Zone Insight
In Zones 6 through 8, warm, humid conditions after midsummer storms are prime time for fungal growth. Monitor daily during July and August for early signs of infection and act fast.
Tough or Misshapen Green Bean Pods? Here’s What Went Wrong
You’ve waited patiently for your green beans to fill out… and now the pods are tough, stringy, or oddly shaped. They bend instead of snapping, feel leathery, and taste like garden twine.
This isn’t bad luck, it’s usually the result of environmental stress or poor timing.
Common Reasons for Poor Pod Quality:
Harvesting too late, after the seeds have matured inside
Irregular watering, especially during hot, dry spells
Excessive heat, which toughens pods and causes malformed shapes
These issues don’t just affect texture, they reduce nutritional quality and shelf life, too.
How to Keep Green Bean Pods Tender and Crisp
Use these practical steps to keep your crop harvest-ready every day:
Pick daily once pods start forming — most varieties are at peak flavor when 4–5 inches long.
A quality pair of bypass pruners, makes morning harvests snappy and clean, helping you pick beans at peak tenderness before they get stringy.
Apply mulch around your bean rows to retain soil moisture and protect roots from heat stress
Water deeply and consistently (not shallow daily sprinkles) to prevent sudden swings in soil moisture
Avoid harvesting during the hottest part of the day — morning is best
Homestead tip: Don’t toss tough beans. Blanch and freeze them for soup stock, or pickle them to make the most of every harvest.
Zone Reminder
In hotter USDA Zones (7–9), pod quality can decline within 24 hours if left unharvested. During heatwaves, harvest every morning to stay ahead of stringiness.

Green Bean Growing: Do’s and Don’ts Recap
Before you head back out to the garden, here’s a quick-hit guide to keep your green bean crop healthy and productive.
✅ Do:
Inspect your plants daily for early signs of pests, fungus, or nutrient stress
Mulch your rows to protect soil moisture and reduce disease splash
A quick way to reduce weeds, hold moisture, and keep soil temps consistent is to lay biodegradable mulch film, it works like a living mulch and goes back into the soil at season’s end.
Harvest consistently to encourage more tender pods
Add flowering herbs or companion plants to boost pollination
Test your soil every season and adjust based on what your beans are telling you
❌ Don’t:
Don’t overwater or let soil stay soggy — it leads to yellow leaves and root problems
Don’t over-fertilize with nitrogen after flowering begins
Don’t wait too long to harvest — pods get tough and lose flavor fast
Don’t ignore spacing — poor airflow invites mildew and rust
Don’t compost diseased leaves or pods — remove them completely
Green Beans Bounce Back Fast. If You Know What to Look For
Here’s the good news: most green bean growing problems: whether it’s pests, yellowing leaves, fungal diseases, or poor pod quality are easy to fix once you spot the signs.
A few small adjustments can make a big difference:
Improve airflow between plants to prevent fungus
Water consistently to avoid stress and stunted growth
Add a few pollinator-friendly plants nearby
Harvest regularly to keep pods tender
If your crop feels like a mess right now, take heart. You don’t need synthetic pesticides or complicated regimens. Just a willingness to observe, adjust, and work with nature, not against it.

👉 Download or Save Your Free Green Bean Troubleshooting Card
Keep this reference guide in your garden shed or kitchen drawer. It’s a quick reminder of what to look for, what it means, and how to fix it—all in one page.
Grandma always said: “The garden doesn’t ask for perfection—just partnership.”
Frequently Asked Questions About Green Bean Growing Problems
Why are my green bean leaves turning yellow?
Yellowing leaves on green bean plants often point to overwatering, poor drainage, or nutrient deficiencies—especially nitrogen. Check your soil moisture and pH, and avoid watering too frequently.
What causes holes in green bean leaves?
Holes are usually a sign of Mexican bean beetles, aphids, or caterpillars like cutworms. Inspect the underside of leaves, hand-pick beetles, and use neem oil or insecticidal soap to stop infestations early.
Why are my green bean plants flowering but not producing pods?
Poor pollination is the likely culprit. Causes include low pollinator activity, too much nitrogen, or extreme weather. Attract bees with companion flowers, reduce nitrogen feed, or hand-pollinate blossoms.
What do fungal diseases look like on green beans?
Common signs include:
Rust: orange or brown spots on leaves
Anthracnose: dark streaks on stems and pods
Powdery mildew: white, dusty coating on leaves
These often show up after storms or in high humidity.
How often should I harvest green beans?
Every day or two during peak production. Leaving pods on the plant too long leads to tough, stringy beans and signals the plant to slow production.
Can I compost infected green bean plants?
No. Never compost leaves or pods affected by fungus, blight, or mold. Diseased material should be removed and destroyed to avoid spreading pathogens in next season’s garden beds.
Looking for more professional guidance & homesteading resources?
Explore our trusted guides to learn more about growing healthy food, managing your land, and building lasting systems for your homestead. Whether you're looking for planting tips, seasonal checklists, or natural solutions that actually work—we’ve got you covered.
Start with these helpful reads:
Everything to know about Strawberries:
Start with Strawberries: Ground Your Garden with Fruit that Grows Back
6 Common Strawberry Plant Diseases and How to Treat Them Naturally
The 6 Pests That Wreck Strawberry Crops—and How to Beat Them Naturally
Beyond Straw: Choosing the Right Mulch for Every Strawberry Bed
Runner Management 101: Multiply Your Strawberry Patch with Purpose
Frost, Flood, and Fungus: Protecting Strawberries in Extreme Weather
The Best Strawberry Varieties for Continuous Summer Harvests
Top 14 Practical Uses for Fresh Strawberries (Beyond Jam)
Start a U-Pick Strawberry Business (Even on 1 Acre)
How to Fertilize Strawberries for Yield, Flavor, and Runner Control
Strawberries in Small Spaces: Balcony, Border, and Vertical Growing Techniques
Wild Strawberries vs. Cultivated: Should You Grow Fragaria vesca?
The Complete Guide to Propagating Strawberries: Growing Strawberries from Seed
How to Integrate Strawberries Into a Permaculture Garden
How to build a low-maintenance 4-bed strawberry system’
Everything to know about Raspberries:
Start with Canes: How to Plant Raspberries for a Lifetime of Fruit
Raspberry Care 101: From Cane to Crop Without the Fuss
Build a Raspberry Trellis That Lasts: Sturdy DIY Designs for Any Backyard
When and How to Cut Back Raspberries: The Right Way to Prune Summer and Fall Types
Raspberry Troubleshooting Guide: Yellow Leaves, No Fruit, and Cane Dieback
Raspberry Pest Guide: What’s Bugging Your Patch (and What to Do About It)
Everything to know about Lettuce:
Lettuce 101: How to Grow Crisp, Clean Greens Anywhere
The Lettuce Succession Plan: How to Get a Salad Every Week from Spring to Fall
Top 5 Lettuce Diseases—and What to Do When They Show Up
Top 5 Lettuce Mistakes New Gardeners Make
Top 5 Lettuce Pests—And How to Keep Them Out Naturally
Everything to know about Tomatoes:
Tomatoes 101: How to Grow Strong, Productive Plants from Seed to Sauce
Tomato Feeding Guide: What to Add, When to Add It, & How to Avoid Overdoing It
The Top 5 Tomato Problems—And How to Fix Them Before They Ruin Your Harvest
Pruning Tomatoes: When, Why, and How to Do It Without Hurting Your Plants
The Top 5 Mistakes First-Time Tomato Growers Make (And How to Avoid Them)
Everything to know about Kale:
The Top 5 Kale Pests — How to Protect Kale from Bugs Organically
How to Harvest Kale the Right Way (So It Keeps on Giving)
Kale 101: A No-Fuss Guide to Growing Tough, Nutritious Greens
What to Do When Kale Looks Rough: Yellowing, Holes, or Curling Leaves
Kale Varieties Demystified: What to Grow and Why It Matters
How to Keep Kale from Getting Bitter (Even in Warmer Months)
Everything to know about Green Beans:
Green Beans 101: Planting, Caring, and Harvesting for Steady Summer Yields
Succession Planting Green Beans for a Full Summer Harvest
The Top 5 Pests That Wreck Green Beans—And What to Do About Them
Bush vs. Pole Beans: Which Is Better for Your Garden?
Everything to know about Zucchini
Zucchini & Summer Squash 101: Planting, Caring, and Harvesting for Massive Yields
The Top 5 Zucchini Problems—And How to Solve Them Naturally
Companion Planting with Zucchini: What Helps and What Hurts
Harvesting Zucchini the Right Way (and Why Size Matters)
The Squash Vine Borer Survival Guide
Everything to know about Watermelon
How to Tell When a Watermelon is Ripe (Without Guesswork)
Watermelon 101: How to Grow Sweet, Juicy Melons from Seed to Slice
The Top 5 Watermelon Growing Problems—and How to Fix Them Naturally
The Top 5 Pests and Diseases That Target Watermelon
Companion Planting with Watermelon: What to Grow Nearby (and What to Avoid)
Other Offerings:
The Summer Garden Reset: What to Do After Your First Harvest
How to Keep a Backyard Garden Alive in 90° Heat (Without Daily Watering)


Facebook
Instagram
X
Youtube